
There's A Hole In My Boat (Part 2)
Last month we discussed how to detect and patch (not "repair") a leak on a typical roto-molded kayak while out on the water. We also discussed what you need in your kit to make such repairs. If you missed that article, here it is: There's A Hole In My Boat - Part 1
First thing we need to do is get the boat off the ground so you can properly evaluate the hull. I have a home grown PVC kayak stand (we'll build that this winter), but you can just use saw horses.
FINDING THE LEAK / TESTING THE REPAIR: In order to fix the leak, you have to find the leak. This requires specialized tools and a defined process. No, not really. You need a blow dryer, some "bubble wand" solution, and a partner. You can also use one of those low pressure air pumps used for pool toys. Resist the temptation to fire up that shop-vac though. It's way too much pressure - just trust me on this one.
Inspect the likely places, such as deep gouges, parting lines around the perimeter of the hull and in the scupper holes. If you see a potential leak, tear off a piece of duct tape; place the "corner" at the suspect location, acting as a pointer.
Ensure all hatches are secured. Now comes the technical part. Remove the drain plug. Have your partner turn the blow dryer on high (no heat); place it over the drain plug opening, using their hand as a sort of gasket. Now, pour a tiny bit of the bubble solution over a pad-eye secured with a rivet. You will most likely see slight bubbles. Using your finger, rub some of the solution over suspect areas, then parting lines, then parting lines inside the scupper holes. Once you locate the source of your leak, dry it off and mark it with duct tape as mentioned before.
NOTE: After your repair, you'll want to retest to ensure your vessel is once again sound.
REPAIRING THE HULL:
Before you can fill that hole, you have to have some material to fill it with. Anytime I make a hole in a boat for a rod holder or hatch I save the scraps, including the drill shavings. You never know when you might need to make a repair. And of course, you want your repair to match the rest of the boat (anything less would be tacky). If you don't have any filler material, you obviously need another rod holder. Most angling kayaks these days come with 2 rod holders behind the seat. On my newest boat, I have the same configuration. So I just added another flush mount rod holder behind the seat. I can safely say that there will be times when I'll need it. Now, should I ever need to make a repair, I'm set.
When I picked up my newest boat, I was fortunate enough to catch David Sims (Action Water Sports) in the act while he was repairing a leak. After watching him work his magic, I was convinced that with some patience, I could repair my own boat (... and I would fearlessly attempt a repair on a friend's boat). But, proper tools are helpful. Enter the proper tool.
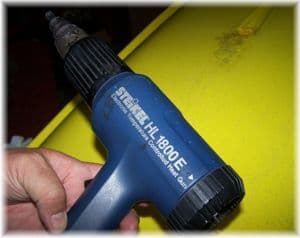
I found these heat guns on the internet for around $70. You could also use a small propane torch.
Get your filler material and make some shavings by drilling multiple holes in it. Straighten out one of the shavings, hold it with some needle nose pliers, fire up the heat source and "weld" it in to the hole, heating the target location and the filler material at the same time. That's the process. But, there's some degree of "art" involved as well.
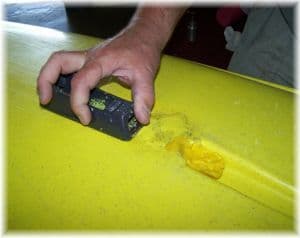
So, once you're done, you can use ordinary woodworking tools to smooth your repair. You can also heat a spoon (held with vise grips) and use that to make the repair almost undetectable.
Finally, pressure test the boat again to ensure your repair is a good one.
AN OUNCE OF PREVENTION IS WORTH A POUND OF FILLER: Hopefully you're reading this article because of its wit and pretty pictures and not because you truly need to know how to repair a leak. If that's the case then good for you. But there are still some things you can do to help prevent a leak. Let's review:
- No rigid stake out poles through the scuppers.
- Do not drag your boat. Use a cart (or a friend).
- Never sit in a boat on dry land.
- Save those scraps when you install a rod holder, add a hatch, etc.
- If possible, store your kayak inside. Sun is NOT a kayaks friend.
- If you must store your kayak outside, cover it with a tarp. Or, use a protectant such as "303".
- Never use your boat to slide down a snow covered hill.
If any steps in the process take you outside your comfort zone, just take it to your favorite kayak dealer and let them do the repair for you. Besides, you probably need to browse the new products anyway.
See you out on the water!
"Many men go fishing all of their lives without knowing that it is not fish they are after"
~ Henry David Thoreau
Related Articles

It was mid-April, circa 2002. There were still patches of snow in the forest. It was one of those days…
Check out these easy modifications anyone can do to their own YAK that proves the best fishing kayak…
Whenever you're paddling, there's safety in numbers and so it's generally not a good idea to paddle…

River obstacles are serious hazards on any waterway - from placid, slow-moving streams to raging,…