Since paddling season is still with us for a while, here is an assortment of paddling/gear tips that are quick and easy and can extend your enjoyment on the water.
Fixing frayed ends on deck lines. Larger rope can be "whipped" by wrapping the fraying ends with a thinner, but strong, durable line. You can also melt the end of nylon or plastic rope to keep ends from fraying. Another handy way, and one that works on nylon strap ends, too, is to dip the end in that liquid rubber stuff used to re-coat tools. It’s available at most hardware stores. You dip the end into the coating, let it harden and, voila, you have a durable and non-fraying end. If you use this on straps, soak about 1" of the strap end in and then wipe or scrape off the excess. Enough will penetrate the fibers to make a tough "tongue" end that easily slips through the buckle. If you don’t wipe the end free of excess goop, it’ll be too thick to thread through the buckle slot.
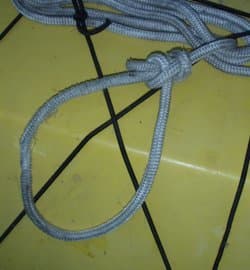
Versatile knot for deck line.
Most kayaks now come with a 5mm nylon deck line that can be used to secure your boat to a dock or to an object on shore (it’s NOT for towing!). I prefer a larger diameter line about 20 feet long and I tie an eight-inch bowline knot to the end. I can then make a quick loop around a rock on shore or toss it over a piling on a dock. It’s also a handy grab line, especially if it’s a floatable line. I usually secure it to the bow, run it back, coil the end and stuff it under a bungee cord forward of the cockpit. The bowline is a convenient "handle" and makes it easy to create an even larger loop to drop over a large log or boulder on shore.
Reflecting Tape.
A past article suggested many uses of reflective tape: The back of paddles, along the extrusion line, on the bow/stern – anywhere you want extra visibility.
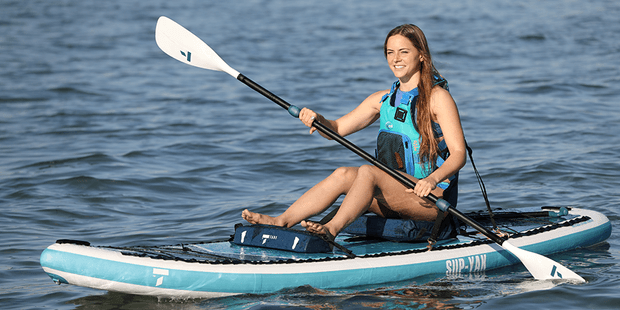
2-in-1 Kayak & Paddle Board complete packages for single or tandem use.
Signal Whistles
Need to shout? Save your voice, carry a whistle with you at all times. Buy several and put them in several places in your gear, in your clothing, but NEVER attach it to the zipper on your PFD! It’s unsafe and marks you as a major rookie!
All-in-One Flying Disc Tool
I still refer to all flying discs as a Frisbee™. It’s a multi-use camp tool: cutting board, wind block, fire fan, foot rest on wet ground, signaling device if it has reflective tape on back side. So many options! (More on Flying Disc uses)
Dry Bag Paradox – a dry bag keeps things dry, as they should. However, if you put just one little item inside a dry bag that contains moisture – it will cause everything in that “dry” bag to become damp! Make sure what goes in the dry bag is dry!
Bright colors for safety
Whenever you are buying gear such as clothing, tarps, bags, etc. choose bright colors. They can double as a signaling flag – bright orange, yellow, ‘lectric lime are best. Red is not visible over long distances.(More on colors)
Duct Tape – Don’t leave home without it! Period!
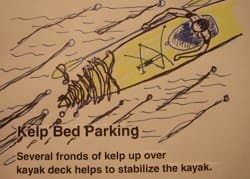
Take a kelp bed break
Native paddlers would "park" in a kelp bed to rest while on open/big water trips. Use your paddle to scoop up a frond and drape it across your fore deck. Do this with a couple of fronds on both sides to stabilize your boat and hold it in place. The kelp, attached to the bottom, hugs your boat while also buffering currents and wave action. Natives could actually sleep while parked this way.
Shoot a bearing the night before If you tend to overnight on islands or across channels and don’t tend to carry a chart, decide where you want to reach the other shoreline, and take a bearing the night before when you can still see. Then if the morning fog obscures your view, you already have a reliable bearing to guide you to your desired end point on the other side.
Don’t fight a quartering wind
A quartering wind without a rudder assist can be easier and reduce weathercocking by tilting your kayak into the wind using your downwind knee. Lift up with your knee and trim the boat slightly as you continue on your desired course and the kayak will tend not to turn into the wind so much.
Make beach signals BIG!
Everything looks smaller from the air. To make emergency signals large enough to be readily seen think 1:5 ratio where "1" is at least 3 feet wide. That means letters or symbols should be at least 15 feet long to stand out to the observer moving overhead.
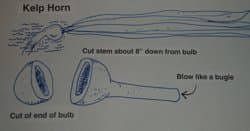
Need a quick, loud signal? Make a kelp horn
Bull kelp has that big floating bulb at the end of a hollow tube. Cut the bulb off about 10 inches up the stem and then cut off the end one-third of the bulb making a bugle-like horn. Pucker up and blow! It takes practice and a lot of slime on the lips, but it’s loud!
Break-away fish stringer
Kayak fishing has been a popular topic this summer. Attach your stringer with a slip knot or other “break-away” option. It should be strong enough to resist the fish tugs, but if a sea lion sees your catch dangling below your boat – splash! I almost had it happen – trust me!
Barbless hooks
Things happen pretty fast when fishing from a kayak. To help release fish quickly, for either catch-and-release, or a quick drop into the boat, consider pinching the barbs smooth on your hooks. It makes removing them easy – and adds a bit of a challenge while retrieving the catch as well. Barbless is also much quicker and less painful to remove should you catch yourself!
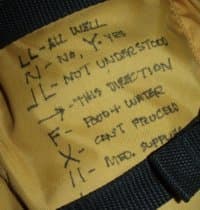
Cheat Sheet for Ground-to-Air/Emergency Signals
To remember which ground to air signal or other emergency signal means what, write them on a piece of gear you’ll always have with you. The inside of your PFD, for example, is a good place to use a laundry marker to jot down those handy signals people use in distress communications. Do you carry that flying disc with you? If so, write helpful reminder notes inside it as well.
Big binoc’s for a steadier view
Sure, tiny, compact binoculars seem more suited for kayaking, but they tend to bob and move around so much its hard to use them effectively. Instead, go for the bigger, heavier models - just use a flexible strap – it eases the stress and tension on your neck. Heavier binoc’s are easier to steady and use in a bobbing kayak. It’s a good trade-off in my book. (More on binoc's)
Short strap on cameras/binoc’s
A shorter strap around your neck means what’s tethered on the other end won’t hang down into that pool of water in your spray skirt nor will it swing down and into that tide pool you are bending over.
Several good pieces of gear have been sacrificed to gain this knowledge. Also, when the "light" comes on and one finds a better way to do something, it’s good to share. Hope some of these work well for you. Safe paddling.