
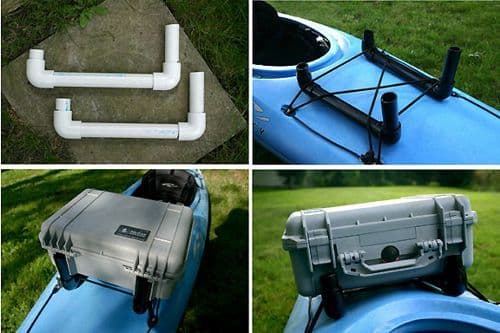
DIY Kayak Camera Case Cradle
7 out of 10 camera repair requests are because the camera got dropped, the other 3 are because the camera got wet. Keep your camera dry!
I almost bought a different kayak shortly after buying my Necky Manitou simply because there's no room for photo equipment in the cockpit and the deck is not very photo-friendly. This particular kayak is quick & quiet (perfect for wildlife stalking) but there was no room for my camera equipment! Perhaps you're in the same boat.
A Pelican case (or Storm, or Sea-Horse, or other waterproof camera case) is the perfect item to carry along; however, the kayak manufacturers never had lunch with the camera-case manufacturers and so there's no accessory to perform the job required.
You'll need to do it yourself.
Kayak manufacturers provide bungie cords on the front deck most of the time, but if you bungie your waterproof case to the deck, it takes too long to un-bungie and it makes too much noise when you remove the cords. The river otters will swim away while you're unhooking your camera stuff! So why not a cradle? A cradle is the answer, but it's going to cost you!
At your local Home Depot or other hardware store you'll spend about $11.02 like I did today. This will get you some PVC pipe, PVC glue and some black spray paint (just for dress-up).
I used 1 1/4" pipe for my photo case because of my Necky Manitou deck. Your needs might be different. Make your measurements carefully. Never mind your kayak; measure to your camera case. The bungie cords on the deck will do the rest. A hacksaw is recommended for PVC pipe, but any saw will work. Cut straight lines if you like things pretty (I do) and use a table saw if you have one (I don't).
With a small amount of investment, you can have a rock steady housing for your waterproof camera box. Rough-water kayakers can add bungie cords to taste.
After this article ran we received the following suggestion from another Paddling.net reader:
Instead of using 90 degree pvc pieces I suggest bending the length of pvc pipe itself. This would allow a more customized fit and cleaner look.
It is done by placing caps on both sides of pipe(these are sold along side with the pipe and other various fittings). Remove one of the caps. Place enough clean sand in the pipe to fill it to the top. Now pour the sand in a pan and heat it on the stove or a hotplate. Once the sand is hot place it back in the pipe and put the second cap back on. Wait a few seconds and then the pipe will bend like cooked spagetti. It will not kink. When it is to the desired shape quickly cool it using a hose.
This is something that you will want to do outdoors and a metal funnel and ovenmitts or heavy leather gloves help as well.
Using this method opens up a lot of possibilities: kayak cradles for one....
- John P. Hay
Did you know this article was a Paddler's Post submitted by one of your fellow paddlers?
Submit your own epic paddling tale, paddling lesson, or helpful tip and share with the community!
Related Articles
~A Paddler's Post submitted by Gregg Jackson~ For decades I had combined the joys of hiking and…

Guaranteed: After watching this video you will want to go look at flight prices to Norway.

I love the self-reliance needed at times for the outdoors. For me this sometimes means…

Wisdom can sometimes be found in some of the strangest places. Recently we made a trip to Key West for a…