
Basic Home Paddle Repair
I can still see myself thrusting the tip of my fiberglass paddle into the murky water as I initiated a very unsophisticated and unanticipated brace. I instantly heard the grating crunch as the tip of the blade ground into whatever hid beneath the surface. Whether it was a rock or a submerged piece of hardened junk, it didn't matter. An edge that had been as smooth as the horizon line on the tranquil Pacific was now a mini-profile of the jagged Rocky Mountains ridgeline.
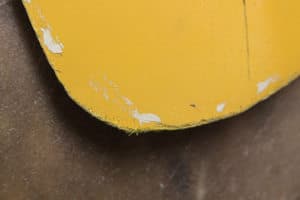
Frequent use, even among the most cautious and careful paddlers, means that blades are going to chip, ferrules are going tighten/loosen and finishes might roughen over time. Most of these dings and other problems are fixable using a minimal of materials and basic shop skills know-how. Let's take a general look at all the things to consider when engaging in the repair of kayak and canoe paddles…
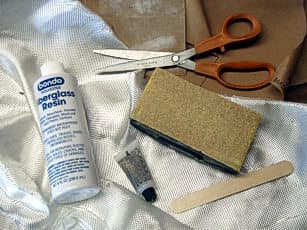
Materials
NOTE: I don't have the space nor the in-depth expertise to go into the details of working with resins and fiberglass cloth - those require "hands-on" shop practice to even minimally master. If you are going to attempt the more complex repairs cited herein, take the time to practice mixing and applying these materials before you attempt to repair your valued gear. While there are no style points involved, a clean repair is a lasting and even safer repair.
- Paddles & Shafts - Typically blades are either wood (mostly canoe) or a variety of materials including plastic, fiberglass and graphite (mostly kayak). Shafts are made of these materials as well as aluminum.
- Adhesives, coatings, etc. - Glues, resins (epoxy, [poly]urethane, methacrylate), marine spar varnish. Here's a brief overview the most common ones:
Epoxy - better mechanical strength, better adhesion, better water resistance than poly (see below). The epoxy resin must be mixed precisely with a hardener and must dry thoroughly before sanding - which is necessary to do between each layer in a multi-layer application. Epoxy adheres to wood, metals, cured polyester laminates, vinylester laminates, epoxy laminates and "extremely well to graphite fibers" according to West System literature on these adhesives. PC-Marine also makes a hand-moldable epoxy putty for "quick, emergency-like" repairs.
Polyester Resin/Urethanes - Often referred to as "boat resin"…it is mostly used for fiberglass repair. It's cheaper than epoxy and because the surface doesn't totally cure, layers can be added without the need to sand between applications. Surfacing agents and hardeners can be added to finalize finishes for appearance and strength.
Sterling Donaldson of Sterling's Kayaks is the renowned "Chemical Man" to colleagues in the kayak industry for his knowledge of resins and their applications. Sterling offered several tips about using poly and epoxy resins. "Stay away from the packaged stuff!" warns Sterling when it comes to buying epoxy off the rack.
First of all, he says epoxy works best if repairs are made with the same kind of resin used initially. Also, if claims are made that it dries within ten minutes or less, "it's not really epoxy," he says. "They won't hold up in water, it will yellow and it's not long lasting." Cure time is also very important for most resins so follow instructions for their mixing carefully. Urethanes also tend to weaken at higher temperatures.
Methacrylates - I am not familiar with this product - It may only be an industrial use product. It's advantages over poly or epoxies are claimed to be excellent impact resistance, good gap filling, excellent peel and shear strength, good flex' at low temperatures. It is apparently what Eddyline uses to build their entire boat.
Other glues - Of the many adhesives on the market, your best bet may be to go to a marine supply store for small repair kits or smaller quantities of bulk resins. Sterling endorses "Gorilla Glue" as one of the best adhesives to use on wood products.
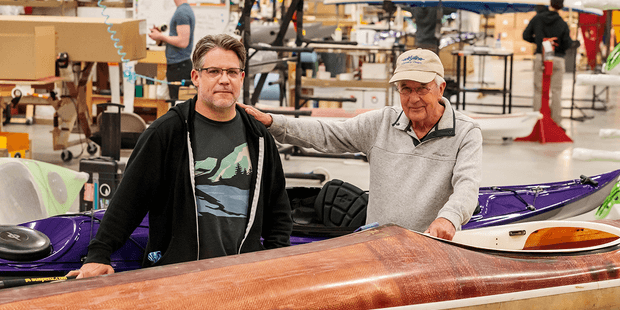
50 years of lightweight, maneuverable, high-performing kayaks.
Check out this interview with Tom Keane, Eddyline Kayaks Co-Owner, on their journey!
The Repair Process
Wooden paddles - Most of the wear on wooden paddles appears as frayed and scraped tips and edges. These can simply be sanded smooth and finished with a few coats of good marine varnish (or polyurethane). Several light coatings are better than one thick application. Typically, you sand down the roughness using progressively finer sand paper. The industry standard seems to be to start with #80 grit paper for the initial levelling and shaping.
The maintenance page on Bending Branches' website also suggests to "sand the area aggressively" using 100 or 120 grit sandpaper to "smooth out rough areas and remove the discoloration." They suggest three or four coats of polyurethane (solvent based), each application prepped by lightly sanding the dried coatings with fine sandpaper to create a final smooth finish.
Refining a rough edge is like sharpening a knife blade in that you want to apply an even stroke to maintain an even edge. Using an official sanding block - or a strip of sandpaper around a palm-sized piece of wood - the flat, hard surface backing the sandpaper will help you maintain a uniform edge.
There are several options for tip repair:
- Sand down and finish;
- Reinforce with fiberglass cloth;
- Sand down and apply an insert (denser wood or perhaps styrene sheet).
Composite paddle blades (fiberglass, graphite) can also be carefully sanded in a similar fashion. Sterling suggests working both blades on a kayak paddle to equalize balance and uniformity in the overall blade system. If you think there is going to be significant material removal, make a template of the new, reduced edge and replicate it on the other end.
Mark Amunrud at Wenonah Canoe-Current Designs Kayaks says they will sometimes make a tape dam along the back edge of a chipped fiberglass blade and fill the gaps with epoxy materials from a kit from West Systems. Their product uses epoxy with fillers mixed into it for either wood or fiberglass repair, or with graphite powder for graphite repair. Once the epoxy has hardened on the wood/fiberglass fix, those areas can be sanded and shaped and then covered with fiberglass if necessary.
Tight ferrules on two-piece paddles - Who hasn't played a game of Tug-A-War with someone as you try to pull apart a stuck, two-piece paddle shaft? Oftentimes just drying out the paddle will loosen sections. A good rinsing, especially after use in saltwater, will minimize micro-crystals of salt from forming between the sections of the ferrule creating a "weld" of sorts that can lock the two pieces together. Therefore, the first approach to most any sticky ferrule may be to slowly pour hot water over the joint while someone pulls and twists carefully from each end
I asked Sterling about this and he responded with an interesting factoid about ferrule tightness in his region of the Pacific Northwest (he lives in Bellingham, WA). He says there is a significant concentration of iron in the sand. Dust created by that mix gets into the paddle shaft and settles into the porous surface of the composite materials. Moisture causes that iron content to oxide (rust) thereby creating a bonding agent that can cause a tight fit. A very careful wet sanding with fine grit (600-800) sandpaper can rid the ferrule of crud. Always wipe or brush away the "dust" from sanding before applying any coatings or adhesives. Auto wax or Armorall is also sometimes used afterwards to lubricate the ferrule (but that might also enable dust and crud to adhere better, too).
Sterling offered the most practical advice for tight ferrules: "Those ferrules fit well when new so keep 'em clean!"
Loose ferrules may be a bit more challenging. Some suggest wrapping a thin layer of tape along the male section of the shaft. While this might be an acceptable temporary fix, the long-term affect is that sooner or later the tape edge curls up and soon it's wearing off, or unraveling possibly causing the ferrule to now stick.
In the manufacturing process used by Werner Paddles, the shaft end is dipped into a marine varnish and then drip-drained of the excess. This applies about a .004-.005" coating onto the end. You could try this at home, using varnish or lacquer - one layer at a time. Too much coating means lightly wet sanding it back down using a fine-grit (#400) sandpaper.
A product called "Lock-Eze" a graphite powder, can also be applied lightly to help dry lubricate ferrule joints (I don't know how effective it becomes if the powder gets wet).
The key to proper paddle repair is going slowly, keeping repair areas clean (and cleaning regularly as a preventative maintenance issue as well) and developing basic skills in the uses and applications of these chemicals. Safety is always a paramount issue so always wear proper eye/skin protection, work in well-ventilated environments, be aware of the flammability of these materials.
Even the most cautious and careful use of gear can't keep it from eventually showing signs of wear. Knowing how to give your equipment an occasional manicure or facelift, whether cosmetically or for structural reinforcing, prolongs its serviceability - and possibly gives one a sense of pride and accomplishment as well. Home repair may well save you a few bucks, too!
Tom Watson is an avid sea kayaker and freelance writer. He also posts articles and thoughts on his website www.wavetameradventures.com. He has written 2 books,"Kids Gone Paddlin" and "How to Think Like A Survivor" that are available on Amazon.com.
Related Articles

In this video, the team at Austin Kayak show you how to rebuild your keel if you have created a hole…

In this video, Chad Hoover shows you how to quickly fix the hull of your fishing kayak. All you need is…

I remember the anticipation of the spring thaw when I could finally get out on the water again after a…

"The major difference between a thing that might go wrong and a thing that cannot possibly go wrong is…