
Shoulder Safety
Unfortunately, too often, I hear of paddlers with sore shoulders or those recovering from shoulder injuries. These injuries range from simple strains to dislocations. I injured my shoulder (a number of years ago) during a demonstration because I was lazy and didn't follow my own instructions. I have personally witnessed four dislocations due to poor technique even though the paddlers were well informed of what "to do and what not to do."
Preventing a shoulder injury is very much a skill that needs to be understood and practiced because it is so easy to get lazy and put your shoulder at risk. The bad news is some injuries never heal completely. Therefore one lazy moment or wrong movement can lead to a lifelong restriction. I hope this is motivation to read further and take this topic very seriously.
On the positive side, if one follows some basic principles of form and function, the chance of injuring your shoulder should be remote or nonexistent. Ever since my injury, I’ve become a fanatic about following the principles of avoiding injuries due to improper form. Having taught anatomy and physiology at the University for years, I also have a solid understanding of the body’s mechanics and incorporate this knowledge in my teachings and the principles I share in this article.
Shoulder Joint Mechanics and Anatomy
The shoulder joint is one of the most moveable joints in the body. It is a ball and socket joint, as is the hip joint. But unlike the hip joint, which has very deep sockets, the shoulder joint has very small and shallow sockets. The great range of motion we get in our shoulder joints has its benefits, but it also opens up possibilities for vulnerabilities such as strains and dislocations.
Without getting too complicated anatomically, the ball (head of the humerus (the arm)) rests on the socket (glenoid fossa - part of the scapula (shoulder blade)). This is all held in place with ligaments, tendons, and muscles. The shoulder joint will stay in place as long as we don't put pressure on the upper limb when it is in vulnerable positions.
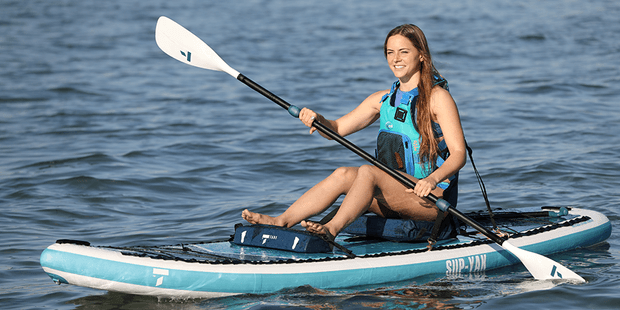
TAHE 10'6 & 11'6 SUP-YAK Inflatables
2-in-1 Kayak & Paddle Board complete packages for single or tandem use.
Vulnerable Positions
Vulnerable positions occur when you have the upper limb out straight with the hand above the elbow and the elbow above the height of the shoulder joint.
Reaching up and back is even a worse position.
When you are in these weak positions and pull down and/or forward, you can strain muscles or risk pulling the ball out of the socket. In most cases, the forces are provided by your own muscles. Injuries can occur due to outside forces, but most often, we cause the injury by fighting an outside force.
How to Avoid Putting your Joints in Vulnerable Positions
The most common way paddlers often get into vulnerable positions is when performing high braces, sweeps, and rolls. Here are a few ways to avoid putting your joints in vulnerable positions.
Execute the High Brace Stroke Safely: Elbows below the shoulders
A high brace done correctly has the hands above the elbows and the elbows pointing down with the elbows below shoulder level.
The key principle is "elbows below shoulder height. "If you perform a high brace and you reach out away from your body, be sure to keep a bend in the elbow and the elbow below shoulder level. The opposite elbow should be tucked in next to your body.
Keeping the elbow lower than the shoulder makes it very difficult to dislocate the shoulder joint, which involves the ball sliding out of the socket. Remember, elbows point down and are lower than the shoulder.
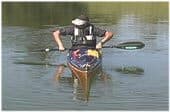
Avoid the “Dislocation Brace”
Here is an example of a straight arm brace, or as I like to call it, a "dislocation brace."
If I were to try to brace in this position, I would pull the ball out of the socket when I pulled down on the paddle when it was on the water. This happens when we get lazy and ignore the simple concept of keeping the elbows pointing down and below the shoulder level.
Avoid having your upper limbs straight and elbows above shoulder height
An even worse position is one that has the upper limb straight and the hand and elbow above shoulder height. This position easily occurs when a paddler is capsizing, and their head is almost at water level, and they try to brace up but forget to keep a bend in that elbow.
When I find myself too far over, I will let myself capsize and roll up instead of trying to brace up.
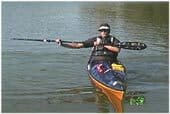
Execute the Sweep Stroke Safely: Avoid reaching back with a straight arm
Reaching back with a straight arm is one of the major causes of shoulder strains. In addition, not rotating your torso when reaching back adds to the strain potential.
This occurs during sweep strokes (especially the beginning of a reverse sweep (See USK article "Supportive Reverse Sweep Stroke")) and using a paddle rudder.
Keep a bend in the elbow and use torso rotation when reaching back. You not only get more power, but you also reduce the chance of strains.
Execute the Extended Paddle Positions Safely
The same principles apply to the extended paddle positions. Still, they are even more important because of the increased lever factor of the extended paddle position, and the force it puts on your body if the skills are performed incorrectly.
When showing the high brace in the extended paddle position, my hands and elbows are in the same position as the high brace shown earlier. The only difference is where I am holding the paddle.
When you use a straight arm, the forces transfer directly to the shoulder. A bend in the elbow decreases some of that force and it also puts the arm in a secure position making it very difficult to slip out of place. In fact, when the elbow is lower than the shoulder, the forces push the ball into the socket.
Side Note: Two of the dislocations I witnessed were from paddlers pushing off of the bottom with their paddle after a capsize. When you first begin to push off of the bottom you still have a bend in the elbow. However, when you get higher out of the water, your upper limb begins to straighten out. Soon you will find yourself not quite up but your arm fully extended. Then the kayak starts moving sideways and you find yourself fully extended with your hands and elbow above the plane of the shoulder while you are trying to keep yourself up. The next thing you feel is your shoulder slipping out of place.
I strongly recommend you don't push off the bottom to right yourself. There is a technique that uses the paddle to push off of the bottom without extending the upper limb. It will be a future skill of the month.
Low Brace Stroke
For those wondering about shoulder injuries while doing a low brace, you can relax. When you do a low brace, and your hands are below your elbow (as seen above), your shoulder is in a stronger position because of the rotation that occurs when the elbow is up, and the hands are down.
Remember we said you are at risk if your hand and elbow are even with or above shoulder level. In this low brace position, the elbow is just at shoulder level, but the hands are lower. This rotation causes the ball to be held firmly in place due to tendons and muscles. I have not yet heard of a low brace dislocation in paddling.
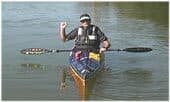
To reinforce the concept with a positive image, look at the picture and remember to keep your elbow pointing down below shoulder level when your hand is above the elbow.
Execute the Rolling Stroke Safely: Keep your hands and elbows in front of your body
As in all proper stroke techniques, keeping your hands and elbows in front of your body is essential in preventing shoulder injuries. If you need to reach back, rotate your torso so your hands and elbows are in the frontal plane. This is an important point when trying to roll.
Some rolling injuries can occur when you let your paddle get behind you instead of keeping it in the frontal plane. Don't roll with a straight upper limb. Keep that slight bend in the elbow.
Other Paddling Techniques to Avoid for Shoulder Safety
Another observed injury occurred to a student with a chronic shoulder problem. They tried the between the boat entry (See USK article "Between the Kayaks Re-entry".)
When they had both forearms up on the kayaks and their feet were in the cockpit, they dislocated their shoulder when they pushed down on their forearms to slide their bodies into the cockpit.
This technique puts your hands and elbows at shoulder level. I would avoid this technique if you have shoulder problems.
As I mentioned earlier, I dislocated a shoulder when doing a demo on my offside, even though I knew this information. I was so relaxed I forgot to keep a bend in the elbow. One minute I was gliding along supported by a moving paddle brace, the next thing I knew, I was capsizing. When I tried to brace up I did so with a straight arm. I felt the shoulder begin to slip so I let go of the paddle. It was too late; the water pressure did the rest as I finished capsizing. Ouuuchhhh!!!
I feel like I have earned the right to hammer this point home – when your hand is higher than your elbow, your elbow needs to be lower than your shoulder.
Don't get lazy, and remember to use proper form when performing your skills which can translate to many injury-free years of paddling.
Permission to use this article must be obtained from Wayne Horodowich at the University of Sea Kayaking (study@useakayak.org). Images obtained from USK's Shoulder Safety page.
Wayne Horodowich, founder of The University of Sea Kayaking (USK), writes monthly articles for the USK web site. In addition, Wayne has produced the popular "In Depth" Instructional Video Series for Sea Kayaking.
Related Articles


While down sizing the books in my den, I came across one of my many logbooks. I opened it up and began…

I was a kayaker before I was a canoeist, and when I was first dragged out on rivers, I couldn't…
Lisa Stocking takes you through a 5 minute paddle exercise routine. This routine is great for all kinds…