
How to Stop Blisters
Kayakers need to know how to treat blisters and, more importantly, how to prevent them. Blisters are common on the thumbs and pads of the fingers where the paddle rubs against the skin. Water softens hands, and sand gets caught in these areas making the friction worse. Friction and pressure with the kayak and excessive moisture from sweat and damp clothing can also cause blisters on the lower back, armpits, hips, bum, knees and heels. If improperly treated, these blisters can become a serious, potentially trip-ending problem.
Prevention
Reduce friction The key to preventing blisters is to reduce friction and pressure. First of all, use proper technique when paddling. Hold the paddle loosely in both hands—enlarging the shaft diameter with a fingerboard may encourage a looser grip. Trim and smooth any rough edges on the paddle shaft, and also consider applying a smooth surface such as cork or shrink-wrap to your paddle shaft.
Develop and maintain tougher skin by training regularly to build calluses. Or, rub your palms with rubbing alcohol or Tough Skin regularly prior to the start of your trip.
If you are prone to blisters, consider pre-bandaging common hotspots with a Spenco Skin Care Pad, Dura Gel or other durable medical gel pad.
Well-designed equipment also helps reduce friction. Make sure your clothing and equipment fit well, minimizing ridges, seams, and zippers along areas of friction and pressure like the back, armpits, hips and bum.
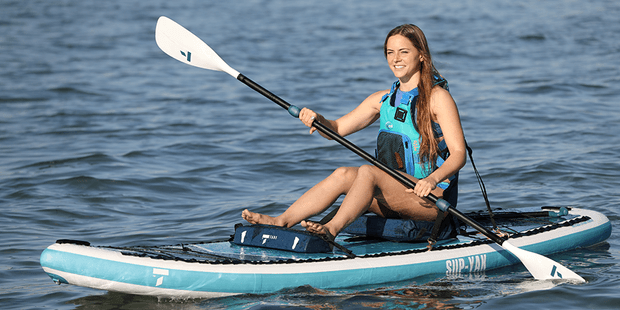
TAHE 10'6 & 11'6 SUP-YAK Inflatables
2-in-1 Kayak & Paddle Board complete packages for single or tandem use.
Keep warm and dry
Moisture contributes to blisters by softening your skin and increasing friction. To keep moisture away from your skin, wear proper layers of technical clothing. If you wear a wetsuit for long periods, wash and dry the underlying skin regularly and try to rinse and dry the wetsuit every few days.
Wear proper-fitting gloves or pogies to help keep hands warm and dry (or at least not soaking wet). Gloves should fit snugly and not have any seams along areas of friction and pressure.
Dry your hands and body thoroughly at rest stops, lunch and especially at night. Consider using talcum powder, cornstarch, or antiperspirant in armpits and groin to reduce moisture buildup.
Treatment
Monitor common problem areas for early signs and symptoms of blisters. There are three stages of blister development, and the earlier you can notice and treat blisters, the better.
Stage 1—Red, irritated skin Cover the affected area with non-adhesive padding such as Spenco Skin Care Pad, Dura Gel or 2nd Skin. Then tape with a micropore tape or a waterproof/breathable tape such as OpSite. Reduce friction and pressure and keep the area dry.
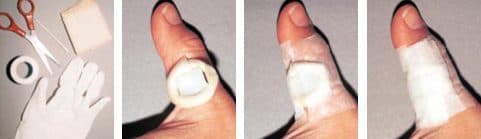
Stage 2—Intact blister with trapped fluid A blister with trapped fluid is called a "bleb." Leave a bleb intact unless it is too painful or awkward. Make a donut to pad around the bleb with non-adhesive foam or ProWrap. Then pad and tape the bleb and donut as in stage one (see photos).
Sometimes, the pain or loss of mobility caused by the blister requires draining the bleb:
- Wash your hands and the affected area thoroughly. Wear disposable surgical gloves.
- Sterilize a thin disposable needle with alcohol or a flame (the carbon left on the needle from the flame is sterile).
- Penetrate the blister from underneath through the healthy skin surrounding the blister, not through the dead skin covering the bleb.
- Treat as a stage three blister, but leave the bleb skin intact to reduce the likelihood of infection.
Stage 3—Broken blister A broken blister is an open wound, susceptible to infection. Infection is a serious, potentially tripending problem. Use only sterile supplies with an open wound.
- Wash your hands and the affected area thoroughly. Wear disposable surgical gloves.
- Remove the dead skin with a sterile disposable scalpel or sterilized scissors.
- Remove any debris by soaking in warm, sterile water or by irrigating with a large-gauge syringe or a bag with a hole.
- Cover the blister with sterile, impregnated gauze such as Aquaphor or Jelonet. The impregnated gauze won’t stick to the wound.
- Pad the blister with sterile gel such as sterile 2nd Skin. If the area is exceptionally painful, surround the wound with a donut as in stage two.
- Tape the area as in stage one, using sterile OpSite or similar waterproof/breathable tape. If there is no sign of infection, change the bandage when it comes off.
Monitor the wound for signs of infection every four hours or so for the first 24 hours and every 12 hours after that. If the wound becomes infected —indicated by red, hot, inflamed skin surrounding the wound and pus discharge—clean the wound site of dead skin, pus, and other debris and replace the bandages every 12 hours until the infection subsides.
If the pain associated with the blister is affecting the patient’s ability to meet the objectives of the trip, consider non-urgent evacuation. If the wound becomes infected and the infection moves beyond the wound site—indicated by fever, swollen lymph nodes, and red streaks from the wound toward the heart—the patient should be evacuated semi-urgently to a medical clinic or hospital.
You’re better off to plan ahead and avoid such serious, trip-ending blister injuries. Before you go on your trip, seek first aid training. Anna Christensen’s self-published first aid guidebook, MisAdventure: Rise to the Challenge! A Step by Step Guide to Accident Handling, is an excellent reference (see review on page 12). Visit a medical supply store or large pharmacy to stock your first aid kit with the blister supplies mentioned here. With proper prevention, monitoring and early treatment, you can stop blisters before they stop you.
Michael Pardy is co-author of the Handbook of Safety and Rescue and a founding director of SKILS Sea Kayak Instruction and Leadership Systems, which offers professional training and certification programs across Canada. He can be reached at skils@shaw.ca
Reprinted with permission from Adventure Kayak Magazine Fall 2003.
Related Articles

Spring is here and the air is warm. But just because the day is beautiful doesn't mean the water…

I just got back from my "end of the season" paddle, which ended up this year to be in Ontario's…

A kayaking buddy, we'll call him "Ben", is one heck of a paddler. He's got years of big, blue water…
Creekboating is as much a game of strategy as it is a sport. Half of your time on creeks is spent…