
Building a Floating Campfire
It was the perfect night on the water. The surface was the mirrored reflection of the cloudless, windless sky. The small flotilla of canoes and kayaks merged to form a loose circle, their bows pointing inward. From out of the hub of these watercraft spokes emerged a reddish-yellow tongue of flames. The warming light flickered off the slick, smooth prows of the boats encircling the fire. And so the evening of the floating campfire began.

That's right, a floating campfire. It was one of many highlights from my Boy Scouting days growing up in Minnesota. We spent two weeks each summer camping at the most remote site available at Many Point Scout Camp not too far away from the headwaters of the Mississippi River. The floating campfire was a special moment, the culmination of a bit of extra work, a little awkward paddling to get it in place and the luck of the gods to give us the perfect weather to make it all possible.
A floating campfire is simply that, a campfire that floats out on the lake and is enjoyed, not by campers sitting on logs, but by paddlers in boats! It may be much harder to gather up all that is needed for a floating fire than it was 40 years ago, but with enough forethought and planning, it could easily be accomplished.
Here's how you make a floating campfire:
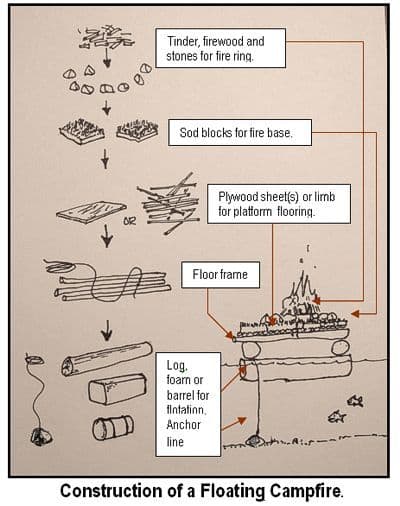
1. The platform is the key, obviously. It must be buoyant – and stable enough - to hold the weight of the frame, the foundation and fire layer as well as the fire ring and the firewood itself. The natural choice is a set of logs, at least 8-10" in diameter that will float. Old foam blocks used to float boat docks work, too, as do old 40-gallon drums. You are going to want a base that is at least 4' square which means you'll need several units of whatever flotation you can find (mix and match as long as it will support the fire and stay level).
2. These foundation pieces need to be lashed or otherwise secured together to form a solid, level base that floats pretty high in the water.
3. A cross frame is usually applied on top of this base and is used to lay a "floor" for the rest of the fire to sit upon. You can use one large piece, or overlapping pieces of plywood to make a "floor" on this base. This is the layer upon which the sand or sod is laid to form the insulation/ground layer of the fire. You can also use an old tarp – anything that forms a solid layer to prevent the sand from sifting through. I've used shallow bricks of sod cut from the rough area around camp. Cut a square about 4" thick and 12" on each side.
4. At this point you now have a patch of ground upon which to build a fire. It so happens that this particular square of terra firma should be able to float (you tested that capability once the foundation was secured back in step 1 by the way).
5. You can now either form a fire ring using rocks or make a framework out of larger logs and make your containment area for your campfire. The base of the fire will ultimately be about 12-18" above the water surface, with the resulting fire and flames another 18-24" high. This enables better viewing for those further from the center of the fire circle.
6. The unit is carefully towed out to the on-water rendezvous and, using a makeshift anchor made from a rock tied to a rope (or an actual canoe anchor), dropped to the bottom. Since most floating campfires are set up fairly close to shore, the water should be shallow.
7. It is usually best to carry the firewood out separately and then build the fire up once everyone is in position. It's fairly easy to lean over and build up the fire from the seat in a boat. If every boat has a few pieces of kindling and even a larger chunk or two, each person can personally be part of the fire building process as the night progresses.
8. Like any campfire, the wood should probably be stacked either in the square pyramid or log cabin fashion (usually built when a reserve of hot coals is desired), or in the form of a tepee fire (kindling all leaded upright against each other in the shape of a teepee frame). Such fires concentrate the flames upward as you would want for heating an overhanging pot. Either works well for the floating campfire idea.
9. Fire safety should prevail on the water, too. Check the wind; make sure the fire is stable and not going to tumble into your lap once you try to light it. The drier the wood the better, as this environment makes things damp pretty quickly. I would limit any fire starting encouragement to dry tinder or newspaper.
10. At this point about the only thing left to do is get everyone's attention and strike a match. If you've ever done a group float before you understand the dynamics of boats floating together in a group. Always keep an eye out for the fire in relationship to the position of the boats, shifting winds and any influences on current – including the wake from passing boats.
Complimenting the mood of the fire with a few treats and snacks is like sitting out on a patio but better. The gentle bobbing of the boats, the flickering of the campfire beneath a clear, star-studded sky and the light chatter of friends makes for a very memorable evening. I enjoy a roasted marshmallow or the more complex "s'more". Snacking on these treats while on the water caps an already pleasurable experience. However, trying to clean off gobs of melted marshmallow that have plopped onto your deck or spray skirt, or dribbled down the front of your PFD is a gooey, sticky mess (not to mention an invite to critters if they are brought back into camp and not cleaned right away!).
If you are on private property, it may be OK to leave the campfire raft up beyond the beach for future use. Otherwise, it's a good idea to dismantle the raft and dispose or store each of the components appropriately for the location.
A floating campfire is a special treat. Be safe. Enjoy!
Tom Watson is an avid sea kayaker and freelance writer.
His latest book, "Kids Gone Paddlin" is available on Amazon.com.
He is also the author of "How to Think Like A Survivor"
Related Articles

This question is from imsealin – they asked how long should a kayak be for sea kayaking, and can it be…

For the first time ever, three adventurers paddled all three of Patagonia's toughest rivers through some…

Spring is here and the air is warm. But just because the day is beautiful doesn't mean the water…

My name's Ken Whiting. I'm a world champion white water paddler. And I've led trips and taught…