Clipping In For A Tow
"Clip in for a tow." It is such a simple phrase yet the implications, concerns and challenges are numerous. So many questions run through my mind when I hear, "clip in for a tow." Here is a peek at the inside of my mind NOT in any priority order:
1. Where do you clip in for a tow?
2. Are the attachment points and the tow system strong enough for the tow?
3. What type of attachments does the tow system have?
4. How much tow line is needed?
5. Is the tow line long enough?
6. How far do they have to tow?
7. Does the towing system have a quick release?
8. Does the tow system have any shock absorbing features?
9. Does the one towing know how to tow?
10. Can the tow system be easily transferred to another paddler?
11. Why is a tow needed?
12. Should we have towed sooner?
13. Does the towee need to be stabilized?
14. What towing configuration will be used?
15. How many tow ropes, if any, are available?
These are just some of the questions that pop into my busy mind. The above questions cover many topics.
The focus of this article will be on the first three questions.
 Once I have my preferred towing system, have decided a tow needs to be done and what configuration I will use, then I can actually begin the process. Clipping in for the tow may have numerous options. The attachment point will vary from boat to boat. On the same boat you can end up with a few different points of attachment. Your attachment points may also be determined by the attachment mechanism (clips or cleats).
Let's review some common options and considerations when you decide to clip on for a tow.
The first thing to look at is the type of attachment method you will use. Commercially sold tow belts typically use some form of spring clip for attachment. Some refer to these clips as carabiners. The two main features you should think about is ease of use and corrosion factor. For ease of use think about the size of the clip and the energy to open the clip. Can you use the clip if you wear gloves during cold weather conditions? The other ease of use factor is the clips ability to attach to and disconnect from cord and lines without having the lines get caught up on the clip itself. The clip on the far right is a standard climbing carabiner that has a notch at the end which adds to the breaking strength of the carabiner when the gate is closed. However, this type of clip can get caught up on the line at that notch. Most of the commercially sold tow ropes are shying away from clips that have that notch.
There is a technique I developed over the years when using notched carabiners for disconnecting from lines. I would rotate the notch out of the way before I would disconnect. It greatly reduced the snag factor. However, I believe it is best to have clips that do not hook when disconnecting.
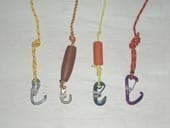
 The first three clips are made of the following (from left to right): stainless steel, brass, plastic. Each of the three Do Not have the notch in question which leads to and easier disconnect. All of the clips in the picture are being held open with a rubber band to show shape of the clipping end. These three clips do well with respect to corrosion. It is always admissible to rinse any metal equipment in fresh water after using it. It is also good to regularly lubricate any moving parts. As a side note, the gates on many climbing carabiners seize up with regular exposure to salt water. My personal preference is a stainless steel clip without notches. You can find a variety of them in marine hardware stores.
Once you have your preferred clip, then you can decide where to attach that clip. Remember you can change clips on tow systems to fit your needs. You may have a tow belt that has all of the features you want from a tow system, but you dislike the clips. There is nothing saying you cannot add a clip you prefer.
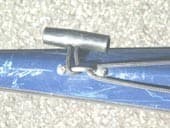
 In this picture we have a kayak that has three possible attachment points if the clip is small enough. If the clip is large then there are only two attachment points. The attachment points on this kayak are the metal grommet, the grab loop and the front deck line.

If you have a clip that will fit through the grommet then you need to ask yourself how well is the grommet installed into the bow and how strong is the grommet itself. I have ripped grommets out from their anchor points. I use a very large carabiner at the end of my cowtail on my PFD. The carabiner is large enough to clip onto a paddle shaft. Unfortunately it is too big to fit through certain bow grommets.
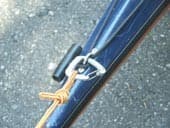
The location of the grommet can also make a small difference. There are some kayaks that have the grommet more than a foot down from the bow of the kayak. This becomes more of an issue when you have a very short tow line where the bow of the kayak being towed is right near your body.
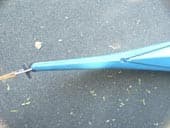
 If you do not have a grommet and/or you prefer to use a bow loop or a grab loop it is important that the clip's opening can fit around the grab loop. I just carried a kayak two days ago that had a front grab loop made out of a large rubber coated grip. It was comfortable for carrying, but a small clip would not fit over it. If this were the case you would need to adapt your technique. You can pass the clip through the grab loop and then use the small clip to clip the line to itself.
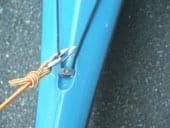
 The third common place for clipping on to a kayak is using the forward deck line (if so equipped). Deck lines are usually down from the bow itself. It may seem straight forward when using a deck line but sometimes our best intentions can backfire on us. Our first example shows how to properly connect to a deck line. You want to connect only to one line. It is a common mistake for the inexperienced paddler to think, "if one line is good two would be better."
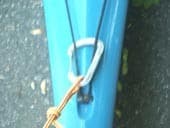
 If you look at this example you can see the clip is placed under both deck lines. While this may seem to be a good attachment, the clip is not really attached to the deck line. The clip is under the deck line. If the front deck line fitting were to break or pop off, the deck line would slip through the clip. If you are clipped to only one line, then losing the front fitting would NOT disconnect the clip.
This leads us into one of my favorite topics when paddlers ask me about towing. "How strong is the tow line?" I pondered that same question when I began kayaking. I soon realized that it wasn't the strength of the rope that was the main concern. The point of attachment should be the focus. I have to say in my experience and that of people I know and trust, I have not heard of a commercially sold tow rope where the rope broke under the strain of the tow. However, it is very common for grommets, deck lines, grab loops, cleats and eye bolts to break loose. These are the attachment points. How the tow line is attached to the belt or the towing kayak is just as important as the attachment points on the kayak being towed.
It is almost comical to see a heavy duty tow rope with a strong carabiner being attached to a small deck line or grab loop. Heck, the breaking strength of a good tow rope and clip can be thousands of pounds. I know the breaking strength of many of the lines I have clipped into were no where near the breaking strength of my towing rope and clip. If the grab loop and deck lines are brand new they are at their strongest. After some wear and tear and UV rays their strength decreases. That is why one needs to inspect all towing points before you leave the shore on your trip. In addition, grab loops and deck lines need to be replaced regularly.
I know a fellow who set up his own kayak to be towed from a cleat he has on his front deck right in front of his coaming. He has a strong bow line run from his cleat through his front grab loop back to his cleat. If he has to be towed he gives one end of his bow line to the person towing. There is a loop on the end of his bow line. The person towing clips into the loop. This way the tow rope is attached to a bow line that runs through the front grab loop and continues to the cleat. What I like about that system is the person being towed can disconnect from the tow while sitting in their cockpit. By releasing the rope from the cleat the free end can run out through the grab loop without catching on anything on the way out. Having the bow line going through the front grab loop keeps the kayak tracking straight when towed. The system also provides one with a bow line. The cleat is useful if you like to use a kite. On the other hand you always have to be careful around cleats because they can be snagging points.
As mentioned at the beginning of the article, there are many considerations that need to be addressed when towing another boat. Many of these concerns need to be thought about long before you actually "clip in." The only way to find out what works for you and what doesn't, is to get out and practice. Also, the next time you are at a kayak demo day or a symposium, take your tow rope clip along and see how it will work on the variety of attachments that are on the market today.
Permission to use this article must be obtained from Wayne Horodowich at the University of Sea Kayaking (study@useakayak.org).
Pictures seen above were taken from the USK DVD "Capsize Recoveries & Rescue Procedures".
Wayne Horodowich, founder of The University of Sea Kayaking (USK), writes monthly articles for the USK web site. In addition, Wayne has produced the popular "In Depth" Instructional Video Series for Sea Kayaking.
Related Articles
In this video, Chad Hoover shows you how to flip your fishing kayak upright and do a deep water…
I always tell my students "when nature calls, answer!" If you are in your kayak and out on the water how…
Sailing a canoe, the act of being propelled across a large lake or wide river, can be absolutely…
The world is divided into two great tribes: Tossers and Hoarders. (Brits won't have any trouble guessing…


