
Wet Entry
The wet entry is more commonly referred to as a wet re-entry, because most paddlers use it to get back into their kayaks after they have done a wet exit. In this article I will refer to the skill as a wet entry. Regardless of your naming preference the skill is the same. The general rationale for using this technique is to avoid climbing up on to the deck of your upright kayak to enter the cockpit. There are a number of reasons for not wanting to climb on your deck, with energy conservation being the primary one.
The original method for doing a wet entry involved doing a reverse somersault into your cockpit while keeping your kayak upside down. This original method kept the kayak completely overturned in order to keep the air in the kayak from escaping because the early kayaks did not have bulkheads, which meant that a kayak could sink if enough air escaped. Since most sea kayaks now have bulkheads it means they should not sink even if the entire cockpit is flooded, because of the forward and aft airtight compartments created by the bulkheads. I remember trying the reverse somersault and it was next to impossible for me to do it due to the floatation in my emersion clothing. I also got disoriented when doing the reverse roll.
The method of wet entry I recommend takes advantage of the floatation provided by bulkheads, which will allow you to lift the kayak on its side for entry. Sliding into your kayak when the kayak is on its side is just the opposite movement that most do when performing a wet exit (see USK article, "Wet Exit"). At the end of the article I will discuss the many advantages to learning the wet entry.
As you will see the actual mechanics of performing a wet entry are easy. The difficulty is the mental aspect of being underwater. I highly recommend the use of nose clips to make the underwater experience less uncomfortable (see USK article, "Using Nose Clips For Kayaking"). As you practice this skill your total immersion time rarely is longer than ten seconds by the time you are upright once you combine the wet entry to a righting method. Most get upright within five to eight seconds.
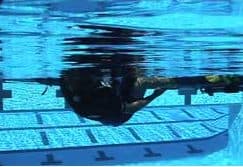
Once you decide to use a wet entry you want to set yourself up for the maneuver. I am a big fan of keeping one leg in my cockpit as a means of holing my kayak. This allows me to have both hands free for other possibilities. With one leg in the cockpit I am facing my bow and resting back on my PFD.
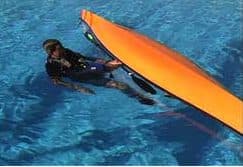
Since a wet entry is not done just for the sake of doing it, we must anticipate this skill being combined with another in order to get us upright. This means I usually need to consider what to do with my paddle. there are three regularly used options for your paddle. One is to hold on to the paddle with the same hand that will hold the coaming. The second is to let the paddle float between your arm and your kayak. You are not in direct contact with your paddle, but the paddle is very accessible. The third method is to have your paddle attached to a paddle leash and you retrieve it when you are upright.
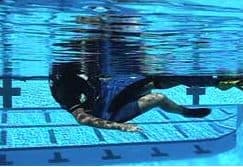
As you can see from the underwater perspective, one leg is in the cockpit and the other foot is floating as you rest back on your PFD. This is also the time when I put my nose clips on my nose. Since this is a planned immersion you have time to attach your clips.
As a side note, I leave my nose clips attached to my PFD shoulder strap. The clips are kept inside my PFD between my outside layer and the PFD. Since the clips are on a lanyard attached to the shoulder strap I just pull on the lanyard to retrieve the clips. Everyone has their own favorite clips since all noses are different. I am a big fan of "Tweaker's" since they are very user friendly and seem to fit most noses.
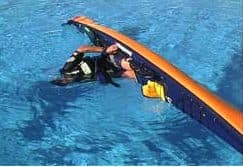
With nose clips in place and paddle in position I start putting my second leg into my cockpit. As you can see I am still breathing. I do not put my head underwater until the last possible moment because I want to keep my breath holding time to a minimum.
In this case, since the kayak is on my left, my left hand is holding the cockpit coaming that is closest to my body. My hands are large so I can also hold my paddle in the same hand. My four fingers are on the outside of the cockpit and my thumb is in the inside of the cockpit.
If I was going to do a roll with a paddle float, the float would be on the paddle blade that is closest to the bow.
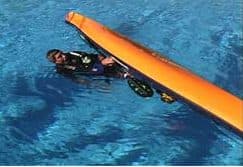
Even with both legs in the cockpit I have no difficulty keeping me head above water. Again resting back on your PFD is the key for keeping your head above water.
It is important to notice that my other hand is still free and not yet holding onto anything. It is your free hand that allows you to lift your kayak on edge and allows you to pull the rest of your lower body into the cockpit. Trying to do this skill with just one hand is extremely difficult and time consuming if you can do it at all. Having both hands on your cockpit coaming makes this a doable skill in a short amount of time.
Now is the time to take that breath knowing you will be going underwater. Don't take too big of a breath because a full lung full of air actually works against you as you are curling up to go under. It gives you the feeling of your lungs wanting to burst. Just take a normal breath.
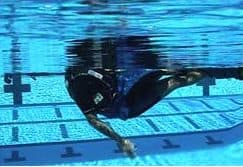
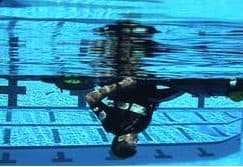
Once I have my breath I reach that free hand to the opposite side of the coaming. As I do so the hand that is already holding the coaming near the surface starts lifting the kayak on edge. As you lift the kayak the weight of the kayak helps to push you underwater.
When you finally grab the other side of the coaming with your free hand you can start pulling yourself into the cockpit.
As I pull with both hands you can see the kayak is on its edge. As I am sliding into the kayak my head is not too far from the surface. As you slide farther into the cockpit you will begin to go farther underwater as your kayak rolls upside down.
Your goal is to get your backside in your seat with your feet on their respective foot pedals. Your knees and thighs need to be under the thigh braces. Your final position is the same as if you were upright in your kayak in good paddling position.
If you do not get fully into a solid sitting position in your cockpit you will have little success in righting your kayak. The key to righting your kayak is dependent upon your knees and thighs when they lift the kayak when under the coaming. This cannot happen unless you are securely in your seat.
By the time you are fully in your seat your kayak will probably be completely upside down. This is when you begin to appreciate your nose clips. Water floods the nasal cavities more easily when you are upside down.
It is important not to rush getting into your seat. The average time for most folks is about six seconds to be fully in their seat. When you are underwater it may feel like an eternity, but it isn't. This is very much a mental skill compared to a physical skill.
You can also see that I still have a hold of my paddle while I still hold my cockpit coaming.
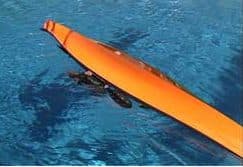
From above all one can see is the bottom of your kayak. They will not know what to do unless you give them a signal. If you are working with a partner you would have already arranged how you were planning on getting upright once you did your wet entry. The easiest assisted wet entry recovery is doing one of the Eskimo recovery options (see USK articles, "Wet Re-entry With An Eskimo Bow Assist", or "Eskimo Bow Recovery", and"Eskimo Paddle Recovery").
If you are alone you have three viable options. If you are near a solid object you can use to roll yourself up, you can swim to the object with your kayak (see USK article, "Swim With A Kayak"). The other two options require rolling your kayak up with your paddle. If you do not have a reliable roll then you can use your paddle float to help you roll up. Very little rolling skill is needed if you use your paddle float (see USK article, "Re-Enter And Roll With A Paddle Float").
If you know how to roll then just go into your roll once you are back in your seat (see USK article, "Re-Enter and Roll"). As a side note, I have always wondered about the logic behind a re-enter and roll. If your roll didn't work in the first place the chances of it working again after you wet exit and then re-enter are not very high. However it is a viable skill. I have used it when I have had to retrieve kayaks that were abandoned by students in caves and rock gardens. In these cases it was best to re-enter, roll up and then paddle with a boat full of water back into open water (see USK article, "Paddling A Flooded Sea Kayak").
Another aspect of the wet entry that is worth mentioning is the extra exposure to your head if the water is cold. Since there are numerous blood vessels around your skull cold water can have a great affect. Cold water in the ears can also cause disorientation in some people. Therefore, I recommend using a hood in cold water if you plan on using this skill.
It is common to feel awkward and starved for air the first few times you try the wet entry. I suggest you start your practice in a warm pool or a warm lake. Do it in shallow water, but deep enough not to hit your head on the bottom. Just try getting in and then get out. Repeat the process a few times. I have seen very positive results if the student gives it an honest try. Once you feel comfortable getting in and out of your kayak, have a friend hold a second kayak near you so you can grab the bow of that kayak after you do your wet entry. You can pull yourself up using the bow of the second kayak.
Another reason I like this skill is it begins to counteract the automatic wet exit response when one capsizes (see USK article, ###a href="http://www.paddling.com/guidelines/showArticle.html?103" target="_new">"Escape From Kayak Attitude"). I think there is a lot of merit to teaching a wet entry before teaching a wet exit if a student doesn't mind going underwater. If you can perform a wet entry, then a wet exit is no big deal. I ask instructors to consider this as a teaching tool for beginner students. I learned this from Tom Long who told me he starts his kids programs off by having them get into there kayaks, which are floating in the pool upside down.
Pictures seen above were taken from the USK Video "Capsize Recoveries & Rescue Procedures"
Wayne Horodowich, founder of The University of Sea Kayaking (USK), writes monthly articles for the USK web site. In addition, Wayne has produced the popular "In Depth" Instructional Video Series for Sea Kayaking.
Related Articles

Even though they are flipping over, missing their gates and failing their maneuvers, they still look…

Last month we discussed how to detect and patch (not "repair") a leak on a typical roto-molded kayak…
A kayaker should have a number of recovery methods to choose from in their bag of skills. I feel the…
It is always good to have a few different ways to perform a capsize recovery. The main solo recovery…