Tandem Kayak Paddle Float Re-Enter and Roll
Ever since I started promoting the concept of wet re-entries, instead of climbing on your kayak for recoveries, I am often asked if the skill can be done in tandem kayaks. My answer, based upon experience, is a resounding YES! The key to success is finding a way to communicate with your partner when you are underwater and ready to roll up.
If you do not know how to roll you can still do this recovery if you practice. I recommend you first learn to master the skill in a single kayak if you have one available (see USK article "Wet Re-Entry and Paddle Float Roll.").
Once you can do it reliably in a single kayak, then all of your practice with your partner will be focused on timing and communication. I will take you through the entire process, from after you wet exit until you are upright with your partner.
After you have wet exited and have decided to use re-entry method, put the paddle floats onto your paddles and blow them up if inflatable. Foam floats cut down your immersion time. Inflatable floats generally have more flotation.
If you and your partner both keep one leg in your respective cockpits, you will both have two hands free while you inflate your paddle floats and attach it to the end of your paddles.

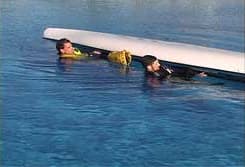
When ready, you both do a wet re-entry keeping the paddle float towards the bow. Learning how to hold the paddle shaft and cockpit coaming takes a few practice tries. Doing a wet re-entry is best done by putting your feet in first while holding your kayak on edge. You are still keeping your heads above water during this part of the maneuver. You only need to put your heads underwater when you are ready to slide your backside into the cockpit.
You can also keep the paddle shaft between your body and arm if you cannot hold onto the shaft and the coaming at the same time. Regardless of how you deal with the paddle, you will be grabbing the coaming with both hands to get yourself securely into your cockpit. One hand on one side of the coaming and the other hand on the opposite side. The hand that is farthest away from the paddle will eventually become the leading hand.
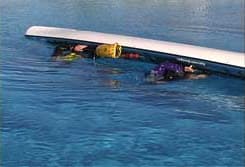
Once you are both in your seat with feet on the foot braces and knees under the thigh braces, grab the paddle with two hands. If you were able to hold the shaft and coaming, then all you need to do is grab the paddle shaft with your other hand. This hand will be the leading hand.
If you had the paddle floating between your arm and body, you will have to look for the paddle with both hands. Once the paddle is in both hands, push both hands toward the sky. This set -up allows the paddle to sweep out without having the uncovered blade get stuck next to the kayak. Since tandems usually have more freeboard, this step is very important.
This next step is where we have to make adjustments since you are working with a partner. I am sure you will agree that timing is everything. Ideally you both want to be in your seat and ready to go at the same time. The only way to find out if one takes longer than the other is to time each other. Whatever the time difference is, adjust for it. If you take 3 seconds longer than me to get into you seat, I have the choice of waiting three seconds before I begin after you go under or choose to hold my breath for three additional seconds. Regardless of your choice, you cannot move on to the next step until both of you are ready. Some choose to slap their hull once loudly to let the other know they are in the seat.
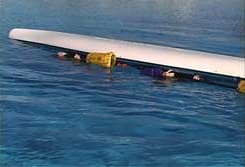
When both are ready, the team leader (previously designated) slaps the hull three times to let their partner know they should both begin the sweep with the paddle. The follower should wait one second after the third slap to give the leader the time to get their hand back on the paddle after slapping. One of my staff prefers to use the bare blade of his paddle to hit the hull three times so he doesn't have to reposition his hand. I am sure you will find what works best for you.
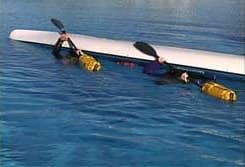
After reaching for the sky with your paddles, sweep the float ends out to the side keeping the paddle perpendicular over your kayak. The uncovered blades will be over the bottom of your kayak as you sweep out.
In order to right your kayak, do a hip snap as you press down on the float. The hip snap is actually a leg action, which rights your kayak. Whichever hand is closest to the paddle float, use the corresponding thigh to pull the kayak upright, by pulling up against the thigh brace (right hand, right thigh.)
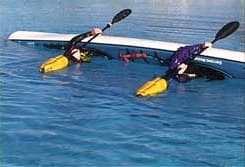
When you sweep the paddle out to the side it is important NOT to sweep passed 90-degrees. The 90-degree position gives you the most support and leverage. If you go beyond 90-degrees, you not only lose leverage you run a risk of shoulder injury and possible re-capsize.
How much your paddle float goes underwater is dependent upon a number of factors which include: actual flotation of float, weight of paddlers, technique of paddlers and distance the float is from the kayak. You get more support if the float is farther from the kayak. Extending your paddle out from the kayak can give you more lift. However, don't put it out too far because you can loose your lever depending upon your technique. Again, it is best to sweep out rather than pulling down.
The first time you try this with a partner you will probably be coming up at different speeds. The one that comes up first will feel like they are being pulled back down. This is a time not to give up. It will feel like one of those slow motion dreams. Keep that paddle across your deck for support. Soon you will feel your partner coming up. With practice, you and your partner will get to the same speed and it will feel great.
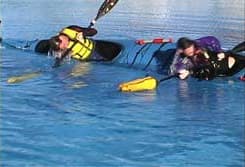
If your partner is always late, I find using the float end of the paddle to bonk them in the head as a motivator works well. (Just kidding?)
Once up, pump out the water. The conditions will dictate if you need to have your skirt on the coaming or not. If water is getting into the cockpit due to rough water conditions, then you should attach the spray skirts.
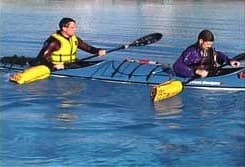
This is a good time to take a momentary break to collect yourselves. You can rest on your paddle floats as long as you keep the paddle shaft perpendicular to the kayak. The key is to keep your balance point toward the float. Unlike the two paddlers here, you can each have your paddle float out to opposite sides (once you are upright) which will give you the advantage of having stability on both sides as compared to one side, as one does when they do this skill in a single kayak.
The advantage to keeping the floats to the same side is for pumping out the water. If you rest your forearm on paddle shaft and hold the pump with the same hand, you will be leaning the kayak towards the paddle float, which allows the water to pool by the pump. That same hand can hold the pump and skirt if need be. The free hand does the pumping. If the pumping arm gets tired you can switch hands, but you will need to swing the paddle around so the float is on the other side of the kayak. On rough days it is imperative you have a stable support while you pump out the water.
Usually the most unstable part of the traditional paddle float recovery is deflating and replacing the float to where you normally keep it stored. The advantage in a tandem kayak is one partner can deflate while the other supports the duo with their float. Once the first float is stored the second paddler can deal with their float, while their partner paddles forward. There is much more stability in a kayak when it is moving. That same partner can also brace as needed.
Again, the purpose of this recovery is to reduce the amount of work the paddler exerts getting back into their kayak. In most cases, a tandem is higher out of the water than a single so it takes even more energy to climb onto the back deck for re-entry. Once upright in the kayak, water still needs to get pumped out regardless of which recovery method you choose to use. One of the advantages in this variation is, the paddler is in the ready to pump position when they come up. It is a very secure position.
Since the year 2000, I have been using this variation as the main solo recovery when I teach recovery/rescue classes. I have found the key is using nose clips during the wet re-entry, because it is a planned immersion. If the water is cold a neoprene hood is also very helpful. I teach this skill as a three step sequence. Step one, get in kayak. Step two, position paddle out to the side. Step three, right yourself. When working with paddlers in tandems, we first work on the skill individually. then we work on the timing and communication.
I recommend you try the skill if you and your partner don't like climbing on to the deck of your tandem kayak.
Pictures seen above were taken from the USK Video Capsize Recoveries & Rescue Procedures
Wayne Horodowich, founder of The University of Sea Kayaking (USK), writes monthly articles for the USK web site. In addition, Wayne has produced the popular "In Depth" Instructional Video Series for Sea Kayaking.
Related Articles
Even though they are flipping over, missing their gates and failing their maneuvers, they still look…
Last month we discussed how to detect and patch (not "repair") a leak on a typical roto-molded kayak…
A kayaker should have a number of recovery methods to choose from in their bag of skills. I feel the…
It is always good to have a few different ways to perform a capsize recovery. The main solo recovery…

