
Side Scramble Recovery
There may come a time when you do not have assistance and you have to enter your kayak as quickly as possible in order to get out of your present location. The cowboy scramble recovery is one option (see USK article "Scramble Recovery") or you can try the side scramble recovery. The side scramble recovery can be faster than the cowboy style scramble, because you are jumping on right over the cockpit rather than the stern of your kayak. However, the side scramble takes a bit more agility and balance if you want to stay upright. This recovery uses the same technique as the BBF recovery for sit-on-top boats (see USK article, "Sit-On-Top BBF Recovery").
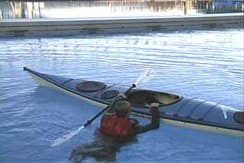
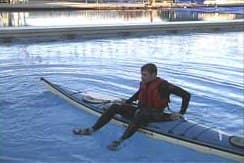
You begin the side scramble recovery on the side of your kayak right next to the cockpit. In this example Jason will choose to hold his paddle throughout the recovery. I suggest you put your paddle under the deck shock cords so you have both hands free to perform the necessary maneuvers. I am a big fan of hands free operations whenever possible. If you have a paddle leash this would be a great time to utilize it.
You need to find hand positions that will allow you to pull your body over the cockpit. I like to reach just past the mid-point of the front and rear ends of the coaming,with my hands wide apart grabbing the coaming. Since this is a quick recovery we will discuss getting water out of your cockpit later in the article.
When you are ready to launch your body over the cockpit, I recommend you kick your feet up to the surface behind you so you are prone on the surface of the water. If you try to come straight up from a vertical position, you will have a tendency to pull your kayak over. The prone position gives you a better chance of NOT rolling your kayak over as you climb on. This also reduces the amount of water you will get into your cockpit as you climb on.
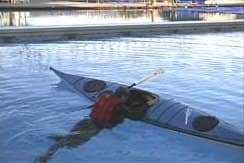
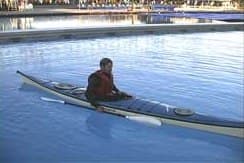
When your feet are near the surface you will give a strong kick with your feet as you press down and pull with your arms to get your body up onto the boat. The press down slightly lowers the boat into the water. The pull gets your body over the cockpit along with the power generated by your kick.
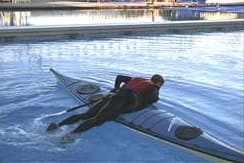
You want to get your naval over your seat. How far you need to get over your cockpit is a matter of your body type and the balance of your kayak. Your goal is to be lying over your cockpit and feel balanced.
If you do not get enough of your body over your cockpit you will find yourself falling back towards the water and you will be taking your kayak with you. If that happens you have two options. Option one is to try to pull yourself farther up onto your kayak by kicking your feet and pulling your body up with your arms. The second option is to push yourself off of the kayak so you can try the maneuver again. I recommend pushing off rather than just rolling back with your kayak. If you roll back with your kayak you will be adding more water into the cockpit. The less water in the cockpit the better it will be for you when you have to paddle off. Remember, you may be using this as a quick get-a-way from your present location. Therefore, you may not have the luxury of pumping out the water until you find yourself in a better location.
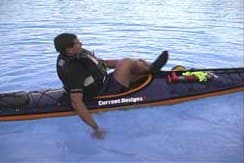
I think this next step is the hardest one of this recovery. In order to keep from capsizing you need to QUICKLY flip your body over so you have your backside in the seat. If you try to roll over slowly your chance of flipping over increases dramatically. In my experience in trying this myself and when watching others, the ones that flip over quickly are the ones with the better chance of staying upright.
In order to flip over quickly you need to find good hand placements that will allow you to lift your body off of the cockpit and allow you to flip your body over. In this case Jason has moved his right hand to the center of the coaming and his left hand is on the back of the coaming closer to the outside of the kayak. Of course, you will find the best place for your needs.
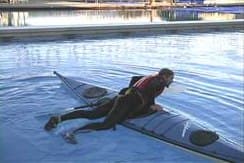
When Jason is ready he pushes down with his arms and uses the power of the right arm to flip himself over. I recommend that you do the flip so you are presenting your back to your seatback. This seems to have the greatest success with the paddlers I have observed.
When your backside falls into the seat your center of gravity is lower and you will feel more stable. However, there is one small caution I must add to my previous statement. Your upper body needs to be balanced over the kayak. The key to that balance is your head movement. If you lean your head back you will find yourself capsizing backwards. If you have your head too far forward after the flip, you will capsize forward.
As you practice this flip you will learn to adjust your head to find that sweet spot for staying upright. The movement of the head moves your upper body into the correct position. This is also a good time to take a few second breather before your move onto the next step. Before you proceed be sure you feel balanced over your kayak.

In order to get your feet back into your cockpit you need to rotate your body so you are facing your bow. As you rotate toward the bow you have a choice of how you want to put your feet back into the cockpit. I recommend to move your legs until you have one leg on each side of your kayak. Sitting in your kayak with each leg draped over each side (leg straddle position) puts the kayaker in a very stable position. Once you feel stable with each leg out to the side, then you can start putting in each leg one at a time.
You can also try putting in one leg as you turn toward the bow and then the second leg to follow the first. This is a bit quicker, because you eliminate the leg straddle step. However, I have seen a few capsizes when this method was tried, because the paddler was not centered. Find out for yourself by trying both options.
Once you are back in your kayak, you are ready to paddle out of your present location. If your kayak is filled with water you will need to maintain your balance as you paddle (see USK article, "Paddling A Flooded Sea Kayak"). If you need to pump out the water I suggest you do it in a location you feel more confident in staying upright. I also recommend that you pump while you are on the move for more stability.
I would recommend not to reattach your spray skirt until you have some momentum. When your kayak is moving you will feel more stable to quickly attach your skirt to the coaming. Sometimes I have just attached the front of the skirt and not bothered with the back, because the opening behind me is so small when the skirt is not attached on the back of the coaming. I attached the front to keep rough water out of my cockpit. Since I am using this recovery technique to get me out of a difficult location, I envision water washing over my deck as in a rock garden area.
Here is a reality check for you larger paddlers and those with small cockpits. In order for this recovery method to work as described, the paddler needs to be able to put their legs back into their cockpit once they are seated in their seat. Since I have such long legs I cannot put my feet into my cockpit as I indicated above.
I have used this method a number of times to retrieve kayaks that were left in caves and rock gardens by my students. I would get out of my kayak and leave it with the group in a calmer location. Then I would swim into the rock garden or cave and do the side scramble entry. However, I cannot finish the last part of the recovery, which is putting my feet back into the kayak. I end up sitting in the seat with my feet straddling each side of the kayak and I paddle the kayak back to the group.
In order for me to get my feet into most kayaks, even my personal kayak, I need to lift my body up off of the seat up toward the back deck. Then I have enough space to get my feet back in one at a time. I have to say this extra maneuver is very unstable. My success rate is not very good in rough water. I have other tricks that will be a topic for a future article.
I prefaced the use of the side scramble as a method to be used when you have to get in your kayak quickly and get out of your present location. This recovery technique can be used whenever you want and is not restricted to any one scenario. I find any scramble recovery a possible option, but they are not the most reliable for many paddlers when conditions are rough. That being said, I have a few friends who have mastered this technique and can perform it in very rough conditions. However, they are the exception and not the rule. In addition, this is one of those techniques that need to be practiced regularly to keep your skills sharp.
Before closing it is worth mentioning that you can try some in water draining methods if you have time to do so (see USK article, "In Water Draining Methods"). This way you can climb into a more stable kayak.
Pictures seen above were taken from the USK Video "Capsize Recoveries and Rescue Procedures"
Wayne Horodowich, founder of The University of Sea Kayaking (USK), writes monthly articles for the USK web site. In addition, Wayne has produced the popular "In Depth" Instructional Video Series for Sea Kayaking.
Related Articles

Even though they are flipping over, missing their gates and failing their maneuvers, they still look…

Last month we discussed how to detect and patch (not "repair") a leak on a typical roto-molded kayak…
A kayaker should have a number of recovery methods to choose from in their bag of skills. I feel the…
It is always good to have a few different ways to perform a capsize recovery. The main solo recovery…