
Launching A Kayak From Shore - Mermaid's Walk
When launching from a shoreline that has surf, the paddler has to find a way to get into their kayak and attach their spray skirt to the coaming, while not being affected by the surge water that comes up on shore. The farther up the shore one starts, the greater the distance that has to be covered to get their kayak to the water. The closer they are to the water, the greater the chance of being floated out by the surge water, while still trying to put on their spray skirt. If it were a steep beach, you could be sucked into a shore break while still trying to get ready. The ideal launching spot usually takes one push off, to get to the point where the surge water can begin to float your kayak out into the surf zone. The act of moving your kayak along the shore has been referred to as the "Mermaids Walk."
When a paddler chooses to use the "Mermaid's Walk" there are a number of considerations that need to be addressed. Here are a few questions that I ask when I choose my launching spot.
1. Can I push my kayak (with me inside of it) the required distance?
2. How abrasive is the shore against the hull of my kayak?
3. Can my hands and knuckles get scraped or cut when I push my kayak?
4. How steep is the beach?
5. What can I use to push, aside from my hands?
When you get into your kayak on shore in a surf area (which could even be waves on a lakeshore) you want a location that will afford you enough time to get into your cockpit and attach your spray skirt. Since the average time between ocean waves is usually eight to twelve seconds, it doesn't allow much time to get ready before the next surge water comes up the beach. That means you need to place your kayak above the surge water. How high above depends on your ability to do the "Mermaids Walk". It also depends on how much you want to scrape up the bottom of your kayak due to the sand, rocks, barnacles and other objects on the shore where you decided to launch. I often joke during my surf zone lectures that you should borrow your friend's kayak when you are learning to deal with the surf zone. Renting could be another alternative while you hone your skills.
If you don't place your kayak high enough up the shore, you can find yourself being taken out into the surf zone, by the surge water, while still trying to attach your spray skirt. The consequences of being sucked out with your skirt still not attached is the possibility of a shore break flooding your cockpit before you are even ten feet from shore. In addition, if you placed your paddle on the shore next to you while you attached your skirt, you may find yourself being quickly separated from your paddle.
The perfect launching location is where the surge water will come up to my kayak and float me enough to ride out with that same surge water. The perfect location does not require the "Mermaid's Walk", so it is NOT the focus of this article. In order to utilize the perfect launching spot, the paddler needs to get in their kayak and attach their spray skirt in that magic eight to twelve second period between waves.
Since the "Mermaids Walk" is used when you have decided to place your kayak ABOVE the surge water, you must keep in mind that the height of the surge water is always changing depending on the size of the waves, frequency of the waves and the height of the tide. Therefore, the more time you watch the surge water, the better informed you will be when picking your launching spot. Your launching spot is not the place to begin adjusting your equipment. All adjusting is done way up on shore. When everything is adjusted and you are ready to launch, then you place your kayak at the launching spot you have chosen.
Let's look at the details of the "Mermaid's Walk".
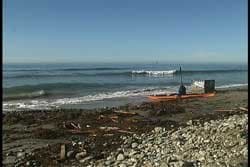
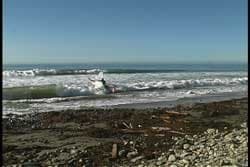
 To give you a relative reference point, so you can see how much my kayak is moving along the beach, I have chosen to launch near a water drainage bunker seen on the other side of my kayak near the stern. You will see my progress in relation to the bunker, in addition to the location of the surge water.
Once I have observed the timing of the waves and the average height of the surge water on the beach, I pick my launching location. My goal is to find the sweet spot that will only require me to do one full push over the beach to get to the surge water. As I said earlier, the height of the surge water varies form wave to wave. When I am in my kayak and ready to launch, I put my paddle into poling position usually in my index hand. My hand position on the paddle allows me to push down and back with the paddle to propel me forward.
My other hand can be used in any number of ways. I have used an open palm and a closed fist as my two primary methods when launching. What I use depends on the the abrasive quality of the beach. I have also used both hands while keeping my paddle across my lap or under by front deck bungee cords. When I am unfamiliar with the launching area or know it can cut my hands, I bring what I call my launching/caving gloves. I found a pair of tough rubberized gardening gloves that are very resistant to punctures and cuts from barnacles, so I protect my hands when I push off when launching. The gloves come off after launching, when I am out in the staging area. In case you are wondering, I rarely use them for landing.
Your body dimensions and boat design may be the deciding factor if your hands can even reach the ground for a push off. You may have to push with the paddle on one side and lean to the other side for your hand to touch. I have one friend who uses a paddle and a pushing stick (one one each side) because their hands cannot touch the shore to get enough push power. I another friend who uses his pushing stick instead of using his paddle for pushing, because over time you can wear down the edge of your blade from pushing into the shore. This is another good reason for the two paddle philosophy. One paddle is a utility paddle (for launchings, landings, recoveries, caves and rock gardens) and the other is a lighter weight paddle for long distance paddling.
In the first picture, I am in my kayak and I am ready to push my kayak down to meet the upcoming surge when I think the surge is going to be a high one.

 When I see a promising surge coming up the beach, I get ready to push my kayak down the beach with the paddle pushing on one side and my fist pushing on the sand on the other side. Notice that the top of the paddle went from resting position (straight up), to pushing position (leaning forward toward the bow). The key to pushing is finding the best spot to get a good grip of the shore and still have leverage to lean forward, while pushing down and back with the paddle and your hand(s).
My choice paddle location is putting the tip in the sand about even with my knees. This allows me to still have a good grip on the paddle shaft with enough angle on the blade to allow me to push backwards. I have to lean forward to get into this position.
Once I am set up, I wait to see if that surge will come up as high as I hoped. If it does, I give a push to meet it. If it doesn't, I wait until another surge comes to my desired location. As a side note, it is easier when the tide is coming in as compared to the tide going out, because the high surge mark keeps regressing as the tide is going out. Also keep in mind, that your kayak can settle into the sand (if it is a sand beach) and the initial part of the push if often braking that little suction grip the wet sand has on the hull of your kayak. Once you start moving the kayak along the sand, the easier it is to keep it moving. If you stop for too long, your hull may feel like it is stuck again.
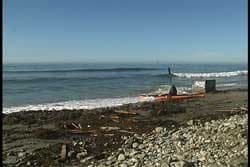
 Now that I have finished my first push, look at the distance that was covered in relation to the water bunker with that one push. If my planning was accurate, I should be able to wait here until the surge comes up to my kayak so I can take my second push and take advantage of the surge water.

I want the surge water to start floating my kayak so it reduces the friction of my hull and the shore. I have reset my position to be ready for another push when the time is right. If I have misjudged my position, I may have to take a second and a third push on the shore to get to the spot where the surge water can start doing the work.
The key is to be patient and wait and see if the water comes to you. As you watch the ocean and waves as they come on shore, you will learn that there are highs and lows. The surge heights rarely hit the same place all the time. That is why I mentioned earlier to watch the waves and surge to find your launching location.

In this case, we can see that my one push got my kayak to a point where the water was coming up to my kayak. As the water comes closer to my cockpit, I start my push to begin breaking that suction I mentioned. As my kayak begins to move, I am getting a cushion of water under the kayak.
If I need to reposition my paddle and hand(s) to get another push, I do it quickly, because this is the time when I want to keep my kayak in motion. As is commonly known in the subject of physics, it is easier to keep a moving body in motion than it is to get it in motion.
The more water that gets under my kayak, the easier it is for my kayak to move and the farther the kayak will move for each push.
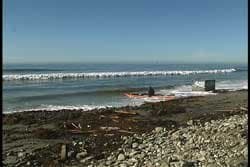
 As the water is passing my cockpit, I am pushing so I can get the whole length of my kayak in the water. If the surge water is deep enough to float the entire kayak, I will move with the surge water as I am floating.

Here is when you will find out if your powers of observation are serving you well. Did you notice if the surge water was coming straight up the beach or coming from an angle? Did you compensate for the angle? You will learn these things when you find your kayak getting turned or spun around as you are floating. If you get spun around so you are no longer pointing toward shore, then you will need to decide how to get your bow pointing again toward the surge water (See USK article: "Shore Spin."). Choosing the correct boat angle, to the incoming surge water, is an important consideration if you wish to launch straight out into the surf. The contours on the beach are an important element that directly affects the surge water.
If you had a sudden big surge, you may find yourself going back up the beach. On a few of occasions I have seen the novice paddler get pushed back up the beach a couple of boat lengths and be left high and dry. Then they had to get out to reposition their kayak closer to the water, because doing the "Mermaid's Walk" that far would be exhausting and very abrasive to the kayak.

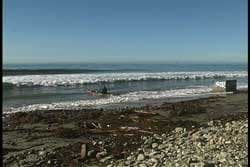
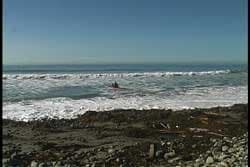
You can see by the bunker in the background that I was successful in my timing and my launch location. One push moved my kayak down to the ideal spot. My next push coincided with the incoming surge and my kayak was floated by the surge water and we are on our way out with the surge.
Keep in mind, it is not uncommon to start moving out when your outgoing speed is not as fast as the outgoing water. You will realize this when you find your self resting on the bottom again. The good news is, the next up surge will be enough to take you out. The down side is, the next up surge will have a tendency to want to move you back up the beach, because there is more power in the surge as you get closer to the water. You need to find a way to keep you in your present position when the fast surge water comes up. I use my paddle to hold my position. Since the fast surge water wants to send my kayak up the beach, I have to plant my paddle to compensate. I plant my paddle blade behind me with the top of the blade leaning towards my bow. It is the same as the push off position. However, I am using the paddle to hold my position until the surge water starts to go out. Then I push off to go out with the water.
You can use the opposite strategy if you find yourself too close to the water and you don't want to go out with the surge. You can plant your blade in front of you (with the top of the paddle towards the stern) to hold your position when the surge water wants to float you into the surf zone. I use this strategy to eliminate the "Mermaid's Walk", when I set my launch point closer to the water. If I cannot get my spray skirt on in the time allotted, I hold my position through one surge cycle. Then I get my skirt on and go out with the second surge. The down side of this method is, the surge water is stronger closer to the water and you need to be able to react accordingly. I have gotten spun around and tumbled by strong surge water in my career by starting too close to the water. Using the "Mermaid's Walk" is a nice compromise to avoid the tumble.
 Once I am on my way, I then follow the basic concepts of launching in surf (See USK article: "Launching A Kayak Through Surf."). There is no need to rush out. Time your movement through the zone. Your goal is to get to deeper water. You will need to punch through any waves that come your way. That is why an efficient and powerful forward stroke is important in a surf zone.
In addition to a good forward stroke, you need to have a reliable and supportive reverse stroke (See USK's articles, "Supportive Reverse Sweep Stroke" and "Supportive Forward Sweep Stroke"). I have found the key to surviving in the surf zone is to use proper timing when Launching and landing. Part of that timing means you will have to sit in the middle of the surf zone choosing when you will charge forward, move backwards or maintain your position. You can only do that if you have strong supportive forward and reverse strokes.

A serious concern in the shallows is avoiding a shore break, because the consequences are higher due to the shallow water. More equipment damage and injuries occur in the shallows, because this is where the force of the water meets solid ground. If you are in the middle of that meeting, then you and your equipment take the brunt of that meeting. Injuries occur due to impact, sudden deceleration and abrasive forces. As always, protective clothing, a PFD and a helmet are recommended when launching into a surf zone.
As you can see from the picture, we had the wave break far off shore and then reform where it became a shore break. This is due to the bottom depth getting deeper after the first break zone. My concern was punching through the shore break, so I can get into the deeper water and then plan my charge through the outside break.
 Once I am in deeper water, I actually sit and take a moment to rest and relax. I am still aware of the oncoming waves. I use my forward and reverse strokes to maintain the position of my choice. That position allows me to watch and time the incoming waves. It is also far enough from the break so I don't have to stroke too hard to punch through the whitewater wave when it gets to my location.
When I am ready to continue to the outside of the surf zone, I pick my moment so I can get passed the break zone. I prefer NOT to have the larger outside break land on me or my kayak. Once I am in deep water, outside the surf zone, I get ready for my tour along the coast. I store my helmet if it is a simple tour and change clothing as needed. I also unfasten items that I usually need for the day, but secure when going through the zone. Also, rudders and skegs are not used in the surf zone.
As you can see, the "Mermaid's Walk" is only the first part of launching from shore when there are waves. There is a lot more to consider once you are off the shore. I have only briefly discussed what to do after you are no longer in contact with the shore, because the focus of this article was how to get you off of the shore when you have waves coming ashore. Again, the "Mermaid's Walk" is used when you need time to get into your kayak and not be affected by the water coming ashore. Once in your kayak, you perform the walk to move your kayak into the water.
I have used the "Mermaid's Walk" over rocks, barnacle encrusted shorelines and abrupt shorelines (abrupt meaning mini cliffs.) I have placed kelp and small logs over the rocks and barnacles to get smooth launches over terrain that could damage the hull of my kayak. Your arm length and boat design may dictate whether you use your paddle and one hand, two hands, a pushing stick or any variation of the three. Regardless of what you use, you will be pushing your kayak along the shore to the water. If it is done on a sandy shore, the trail that is left behind in the sand could be viewed as a mermaid pulling herself along the sand to the water. So when you are walking along a beach and see some hand prints and a groove in the sand leading to the ocean, you will have to wonder if it was a kayaker or a mermaid heading back to the water where they are meant to be.
Pictures seen above were taken from the Award Winning USK Video "ABC's of the Surf Zone"
Wayne Horodowich, founder of The University of Sea Kayaking (USK), writes monthly articles for the USK web site. In addition, Wayne has produced the popular "In Depth" Instructional Video Series for Sea Kayaking.
Related Articles
Flexibility is always a good topic of discussion when it comes to kayaking. Depending on our style of…
Kayak Catfish does some trolling with crappie magnets to catch some catfish bait.

How many of you have ever heard that paddle craft (vessels under oars according to the Navigation Rules)…

More times than not, the reason you aren't catching big fish is not because you aren't doing enough…