
Installing Float Bags
Photo 1:
Use a paper, cardboard or plastic jig to mark the float bag cage holes so they are aligned with the holes on the other side of the boat. Mark the 3/16-inch holes every four inches starting at the end of the deck plates and continuing for as far as you want the bags to extend. Drilling holes in a new hull feels wrong, but the holes will be filled when laced with nylon cord. Be gentle with the drill, even the dullest of drill bits can tear through Royalex with ease.
Photo 2:
To install a bow or stern grab loop and another anchor point for the cages, drill a larger 7/16-inch hole. We checked first to ensure the holes wouldn’t interfere with the spray deck we will install later. Tie a single loop of 3mm nylon cord through the holes and tie off as tightly as possible inside the boat. Then thread a generously long piece of nylon cord through the holes with the ends inside the boat. Pick up some 5/8-inch OD clear vinyl tubing and a metre of webbing at a hardware store. Force the webbing through the tube, into the holes and tie it on the inside of the canoe for a cheap, comfortable and easy-to-use handle.
Photo 3:
Weave the nylon cord through the 3/16-inch holes starting from the bow or stern. On the last crossing on the inside of the hull tie a loop as a stopper using a figure eight on a bight. Then tension the cord backward through all the holes until you’re back at the first end. Thread the first end back through one of the holes and tie it off with a few half hitches on the inside of the boat. Go back to the last crossing and tie three additional evenly spaced figure-eight loops. Tension this end, threading it back through one hole to tie it off on the inside of the hull with half hitches. The result is a snug cage in which the last strand has two evenly spaced loops in the middle and two stopper knots against sides of the boat so they can’t slide off center.
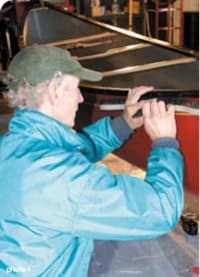
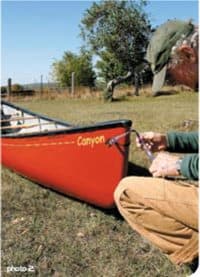
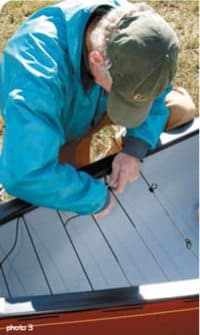
Photo 4:
Without the deck plate on this play-boat you can see how the webbing grab loop and single loop of nylon cord are attached. The nylon cord loop is the anchor for a piece of webbing running down the centre of the bag cage. The two nylon cords run from the grab loop holes to the figure-eight loops, underneath the nylon cords that go across the canoe to form a grid with gaps small enough to keep the bag from rising and escaping under water pressure.
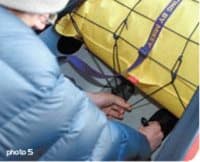
Photo 5:
Directly below the line of figure-eight knots, place three evenly spaced vinyl patch anchors. Mark the outlines of the patches with a grease pencil and glue them in place. Let the glue dry for 24 hours, then thread the cord through the figure-eight knots and anchors in a "W" pattern at the end of the cage. Using a centre anchor with a clip allows you to easily unclip the cord and webbing to access the float bag area.

Reprinted with permission from Adventure Kayak volume 5 issue 2, Early Summer 2003.
Rapid is a magazine dedicated to all whitewater paddlers. But the demographics of whitewater are such that the majority of paddlers are 25 to 45. Rapid’s colourful, pictorial look is a shift toward capturing the attention of the lifestyle-driven, hugely powerful and influential group of teens waiting in the wings. Rapid Magazine is proactively building the next generation of the whitewater paddling market. Read full articles online at www.rapidmagazineinc.com/rapid/.
Related Articles

In this video, the team at Austin Kayak show you how to rebuild your keel if you have created a hole…

What is the main difference between a dry suit and a semi-dry suit? Why is there's such a big difference…

NFCT auction supports stewardship, programs for 740 miles of waterways This fall, paddlers and…

A red-tailed hawk was rescued by two kayak fishermen, Matt Wells and Dana Scroggins, after it was…