
Extended Paddle Forward Sweep Stroke
When we perform a normal sweep stroke some of our energy is lost as a result of our blade moving through the water. If our blade would stay fixed in the water when we place it there, then all of our energy would be transferred to moving our kayak. However, in regular paddling position our blade does move through the water so energy is lost with each stroke. It is also important to understand that the greater the arc (the farther the blade is away from the kayak) the more turning power you achieve.
If we were to extend our working blade away from the working hand the loss of energy is less, because the blade does not move through the water as much. The farther that blade moves away from the working hand the more fixed it becomes in the water. By using extended paddle strokes we can take advantage of that longer lever with less energy loss and produce a greater arc.
The extended paddle forward sweep stroke is a great stroke to use for quick turns and turning in windy conditions, where the winds are trying to prevent the turn. It is well known that a kayak will pivot easier when it is on edge. We also know the more you edge your kayak the closer you get to your capsize point. Therefore you have to find that sweet spot where you have maximum edge and still feel stable. The beauty of the extended paddle sweep stroke is it can also provide more stability than you get from paddling in normal paddle position. That longer lever provides a stronger brace, which allows you to edge even more and still feel stable. The result is more power, more stability and more turn per stroke. Even if you choose not to edge your kayak you will still get greater turning than a regular sweep stroke, because your extended paddle creates a larger arc when doing the stroke, which yields a greater turn.
Let's look at Derek C. Hutchinson doing an extended paddle forward sweep stroke. Derek demonstrates this stroke with a slight climbing angle on the working blade so the blade stays near the surface, thus providing support, so he can edge and lean while still getting plenty of forward power.

The extended paddle position has your outside hand holding the non-working end of the blade near the bottom of the blade. The non-working blade is near your chest area.
The working hand is about a forearm's length away from the throat of the non-working blade which results in the working blade being farther from your working hand. Remember, the key is to get the longer lever by moving the working blade away from the working hand.
Another way of describing this extended paddle position is to begin by holding your paddle in regular paddling position with your eyes closed. Have your paddling partner take the paddle from your hand, but you keep your hands ready in paddling position. Then have your partner replace the paddle back into your hands with the end of the paddle in one hand, which will leave you with the paddle shaft in the other hand. Your normal paddling position (distance that your arms are apart) is the same in the extended paddling position.
A third way of describing the position is by starting into a high brace position (See USK November 2007 article, "High Brace And Low Brace Blade Mechanics"). Once in a high brace position, move the working blade away from your working hand until the non-working blade is in your non-working hand. The non-working hand is there to support the bottom of the non-working blade. Holding the blade on the bottom is important, because if the blade slips off of your hand you can end up capsizing, or as Derek fondly says, "You will become one of the swimming public".
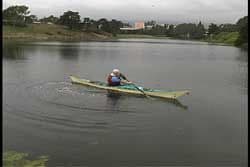
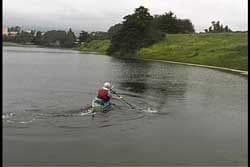
 The stroke begins at the bow of the kayak. Place the blade flat on the water with the power face on the water as if you were going to do a brace. This stroke begins in a high brace position.
As you begin to sweep the blade, turn the blade so it is in on a 45 degree angle. The angle provides turning power and support. Again, the stroke can also be done with the blade on knife edge for the most power, but you loose the support. As you will experience, the combination of power and support will provide a greater yield turn.
When you begin your stroke, keep a climbing angle on the blade and lift the knee opposite the working blade so your kayak goes on edge. You can also lean out on the paddle, because of the tremendous support it is providing as it stays near the surface during the stroke.
 It is important to remember the purpose of this extended paddle sweep stroke. Your goal is to get a faster turn and/or turn in windy conditions. It is well known that a kayak will turn easier when it is placed on its edge. Utilizing that concept is the reason why I suggest that you use a climbing blade angle when you do the stroke. That climbing blade angle provides tremendous support when you are in the extended paddle position. With lots of support, you can feel more confident to edge your kayak and even lean your body so you can can the most yield from your turn.
How much you lean is dependent upon your experience and comfort level. The 45 degree angle I mentioned above is just a starting benchmark. The flatter the blade (less angle) the more support you get, but less power for the turn. The greater the angle, the more power you get for the turn, but less support for your edging. You will learn to adjust the blade angle for your particular needs in your given conditions.
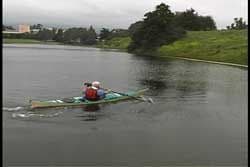
 When your paddle shaft is at 90 degrees to the kayak, you will have your greatest support. Look how much Derek is edging his kayak. Also, see how much he is leaning. If that paddle were taken away, he would be in the water. He truly has his balance point far out beyond the cockpit. It is easy to see his top rear deck is partially underwater.
As you get confident in this stroke, you will start edging and leaning as soon as you place your blade on the water. As you sweep the blade away from your bow, your paddle support increases as your paddle shaft angle approaches the 90 degree point. The greatest turn yield is during this first half of the stroke.
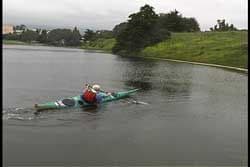
 As your paddle shaft moves passed the 90 degree point, your support will begin to diminish. This is when you start bringing your balance point back over your kayak. Notice Derek's body is no longer out over the water. As his paddle is nearing the end of the sweep stroke, Derek gets himself over his kayak so he is no longer depending on his paddle to keep him upright.
Once your paddle shaft makes a 45 degree angle with the stern of your kayak, you should be well balanced over your kayak. Your stroke is finished. If you were to try to continue the stroke, the turning yield is not worth the risk of capsizing. Remember, this is a rough water turn and trying to turn that far back is not only difficult for most it is not a very stable position.

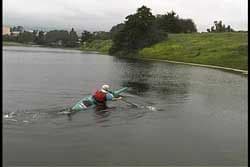
If you need to keep turning your kayak, you will need to do consecutive sweep strokes. Once he is upright and the stroke is completed, Derek changes the angle of the working blade. He does this so the other edge becomes the climbing angle for the recovery portion of the stroke.
Derek recovers his paddle by moving the paddle along the surface, back towards the bow, without putting any pressure down on the blade. He doesn't want to undo the work he has just completed. He deliberately keeps the paddle in contact with the water rather than lifting off of the water when moving the blade back to starting position.
 The advantage of lightly skimming the blade on the surface, back toward the bow, is the insurance you have by the blade being in the brace position during the entire recovery portion of the stroke. If it is rough conditions you are set up for an immediate brace on the working side.

To make sure you don't capsize on the other side, I suggest you keep a slight edge or lean toward the working side. You are still balanced over your kayak, but you are favoring the working side.
When the blade is back at the bow repeat the stroke until you achieve the turn you desire.
As I mentioned earlier, this stroke can be done without any edging or leaning. It can also be done with your working blade on knife edge (blade perfectly vertical). Just having the larger arc, due to the extended paddle, will give you greater turning potential. If you wish to maximize that potential, I recommend you incorporate the climbing blade angle with edging and leaning.
Special thanks to Derek C. Hutchinson for teaching me this stroke and for letting me use stills from his video Beyond the Cockpit which focuses on extended paddle maneuvers, supportive strokes and rough water turns.
Pictures seen above were taken from the USK Video "Beyond the Cockpit - featuring Derek C. Hutchinson" Permission to use this article must be obtained from Wayne Horodowich at the University of Sea Kayaking (study@useakayak.org).
Wayne Horodowich, founder of The University of Sea Kayaking (USK), writes monthly articles for the USK web site. In addition, Wayne has produced the popular "In Depth" Instructional Video Series for Sea Kayaking.
Related Articles

Even though they are flipping over, missing their gates and failing their maneuvers, they still look…

In this video, we're going to look at five kayaking tips that will help make you a better paddler, or…

Most paddlers will develop a forward stroke that is powerful enough to get them where they need to go,…
Eddy turns are the foundation for paddling in current, enabling you to enter and exit river and tidal…