
Eskimo Bow Recovery
When the original kayakers capsized exiting their kayak was not an option because of the cold water. They had a variety of techniques for getting upright. One of the techniques was getting an assist from a partner in another kayak but not wet exit.
The Eskimo bow assist is still very useful today even though we don't have the restrictions of not wet exiting. If we dress for immersion a wet exit should not be a big deal. However, if an assist is nearby we can save a lot of time and energy by staying in our overturned kayaks.
This recovery method has less overall exposure time than if you were to wet exit and do any of the assisted recoveries. The Eskimo bow recovery has provided me a great back up when I was learning my braces and practicing my rolls. I was more apt to practice knowing I didn't have to wet exit if I missed a roll or a brace. It is also a great way to quickly cool off on a hot day without long immersion time.
Learning how to hang in your kayak when it is overturned is a skill worth developing. The Eskimo recovery helps develop "hang time." In addition, the basic movements of this skill are the ones used in rolling.
When you capsize, and your partner is near enough to assist you (and they know this recovery method), this is what to do: Lean forward as close to the front deck as possible. Reach both hands into the air, one on each side of your kayak. Your paddle can stay between your arm and your kayak.
When you first go over bang on the bottom of your kayak to get your partner's attention. Then keep your hands up in the air moving them forward and backwards along the side of your kayak. Be sure to keep you hands off of the kayak to prevent your hands getting pinned and smashed by the oncoming bow of your partner's kayak.
The person assisting can come in perpendicular to your overturned kayak, on an angle or parallel. We will discuss the parallel method another time. The parallel method is sometimes called the Eskimo paddle recovery.
The goal of the assisting paddler is to put their bow into your hands. By moving your hands you can feel their kayak if they come in and just miss you.
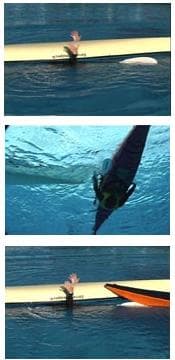
When upside down you can easily get confused as to the direction from which your partner is approaching. That is why you keep both hands up and move them.
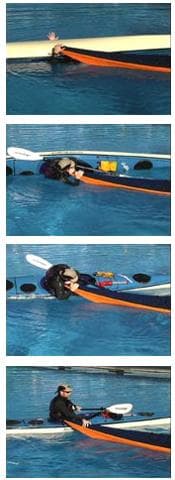
Once the bow is in your hand you will begin to pull yourself up. Then you bring your opposite hand onto the bow. When both hands are on the bow pull you head up and rest it on the bow.
This is a good time to take a breath since you have been holding your breath for a while. If you did run out of air before your partner arrived, you could come up for a quick breath and continue hanging. Pushing down with both hands on one side can give you the lift you need to get that breath. If you do try for that extra breath while waiting, be ready to protect you face and head from the oncoming kayak.
The next step is a basic movement for rolling your kayak. Instead of pushing on the bow and lifting your head, it is easier to right your kayak by using your leg and trunk muscles. The movement is commonly referred to as a "hip snap." If you look at the previous picture you can see the kayak laying over the paddler. The hip snap gets the kayak upright, then you bring your head up. Believe it or not, this movement takes less energy than trying to lead with your head.
Once the kayak is upright you can follow with your body with the head coming up last. Once upright you can look for your paddle which should be nearby if you started with the paddle parallel to your kayak floating between your arm and kayak.
As you can see the kayaker is now upright and they never had to wet exit. As mentioned before, the overall immersion time is much less with this recovery method as compared to one involving a wet exit.
Your submersion time is dependent upon how long it takes your partner to get to you. Therefore your partner needs to practice their sprint and and emergency stopping skills. A supportive reverse sweep stroke will add stability when stopping. You and your partner should practice the assisting role so you can perfect your aim.
Coming in on a slight angle is a bit easier than coming in at a right angle. Also, by coming in on an angle you can use the Eskimo paddle assist as a back-up if you over shoot your partner's hand.
Again, I found this recovery method a great way to practice my bracing and rolling. My partner would set up close by and come to get me if I missed a brace or couldn't roll.
Of course this method is only as good as your ability to hold your breath. The more relaxed you are the longer you will be able to stay down. The colder the water the faster you will want to wet exit. We all know how that ice cream headache feels. Trust me when I say this gets easier with practice.
When you practice do it in the reverse order of how I presented the skill. Start with the hip snaps. Then go under, but hold the bow with one hand. Then go over next to the bow and then reach for it. Once comfortable with the skill, have your partner move farther away. Over time this recovery method will be another one in you arsenal of recoveries.
Permission to use this article must be obtained from Wayne Horodowich at the University of Sea Kayaking (study@useakayak.org).
Pictures seen above were taken from the USK Video "Capsize Recoveries & Rescue Procedures".
Wayne Horodowich, founder of The University of Sea Kayaking (USK), writes monthly articles for the USK web site. In addition Wayne has produced the popular "In Depth" Instructional Video Series for Sea Kayaking.
Related Articles

Even though they are flipping over, missing their gates and failing their maneuvers, they still look…

Last month we discussed how to detect and patch (not "repair") a leak on a typical roto-molded kayak…
A kayaker should have a number of recovery methods to choose from in their bag of skills. I feel the…

There are two ways of swimming through a rapid. You can swim defensively or offensively. Defensive…