
Bring a Dutch Oven for 5-Star Campsite Meals
We are talking about a heavy cast iron pot, not the prank you pulled on your sibling when sharing a bed at your Auntie’s house.
These heavy pots were patented by the British brass worker, Abraham Darby, in 1707. Darby borrowed the method of casting brass in sand from the Dutch and then started casting iron the same way to make the pots more affordable. He called his pots Dutch ovens and for 300 years the name has stuck. According to Wikipedia, the famous American patriot, Paul Revere, added to Darby’s design to create the Dutch oven with legs and a flat lid, the style favored by campers today.
The Dutch oven is the most versatile cooking pot imaginable. You can use it to roast, fry, boil, stew and bake. It will take a beating and never break. You can cook pretty much anything over the fire or camp stove in your Dutch oven. But really, the justification for carrying the extra weight of a Dutch oven on a camping trip is to be able to bake. If you enjoy camp cooking, you will love camp baking your favorite casseroles, as well as breads and desserts.
All it takes is a bit of prep and a simple set up. Then you just relax and wait while your food bakes. Here are some tips for perfecting the process and baking five-star meals and treats in your Dutch oven at your campsite.
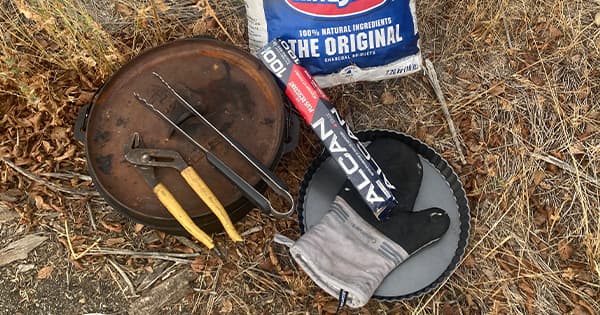
What you need for the best campsite meals
The Pot – Dutch ovens come in many sizes. A 6qt, 12” diameter pot, will work well for most things you are cooking for 4-6 people. If you normally camp in bigger groups, go bigger. The ideal setup is to have two Dutch ovens that nest together for packing. This allows you to bake two things at once, dinner and dessert or bread for the next day.
A good 6qt, cast iron, Dutch oven weighs about 15-18 lbs., a lot to carry on a portage and simply too heavy for a hiking trip. GSI makes an anodized aluminum Dutch oven that is worth considering. Although not as good as cast iron for baking (harder to get good even heat), they perform well and are less than half the weight, they come in three sizes and can nest together for packing.
Charcoal Briquettes – I recommend using manufactured charcoal briquettes for baking with your Dutch oven. This is the secret to consistent, high quality, campsite-baked goods. When you are carrying a 20 lbs. pot, a bit of charcoal is no big deal. It is also possible to use a bed of fire-coals and to pick coals from the fire to place on the lid, but it is much more challenging to get even heat. I always carry enough charcoal to bake bread and desserts. If space is an issue, I will supplement with fire-coals for other baking. If you are baking a casserole, even heat is not as important, but maintaining even heat is the key to baking the perfect loaf of bread or brownie.
A Pan Underneath – This is not critical, you can use a flat rock or a piece of tin foil, but for best results get an aluminum pizza pan the same diameter as your biggest Dutch oven.
Aluminum Foil – Any reflective fireproof material will do. I find heavy-duty aluminum foil works best and it can be reused many times.
Tongs – you will need tongs to move around your charcoal briquettes and/or fire-coals.
Channel Locks – have many uses on a canoe trip, including moving around the heavy lid and pot of your Dutch oven when it is piping hot.
Oven/fire Mitts – Get a good pair, the Dutch oven gets very hot and is very heavy.
The How to…
1) Prep your food and when it's ready to bake, put it in the pot.
You can use the same recipes you do at home. Basic bread recipes, sourdough and soda bread all work well. Instant muffins, cake and brownie mix also work great with this method. Other Dutch oven campsite favorites include, my mom’s simple lasagna recipe (substituting ground beef with dehydrated beef), Shepherd's pie with dehydrated potato flakes and frittata with fresh or powdered eggs.
2) Get your coals burning. Either on the campfire or on your camp stove. You will need twice the number of coals as the diameter of your pot in inches plus a few (28 briquettes for a 12 inch pot). Once glowing hot, place a few less than half these coals, evenly spaced on the pizza pan (or foil) to go under the oven.
3) Place your Dutch oven with food inside over the coals (if your Dutch oven does not have legs, place some small stones under to keep the weight of the pot off the charcoal). Then put the remainder of the glowing briquettes on the lid of the pot.
If you want to bake multiple things at once, now is when you can stack another Dutch oven on top and place coals on its lid.
4) Finally wrap the pot in foil. Let a little air in the bottom and up the sides. Leave some airspace above the pot and pinch the foil closed on top so the heat from the coals is reflected back onto the pot. This method should keep the inside of your oven between 350 and 400 degrees (F). If you want cooler use a few less briquettes, for hotter use more. You will have to experiment a little with your specific set up.
5) Sit on the beach, in your hammock or at your happy place until the food is ready.
Check on your food a little sooner than the recipe calls for. Carefully open up the foil and lift the lid. Check your food how you would check anything from an oven (thermometer, toothpick, knife). If it’s ready, dispose of the coals safely and enjoy your meal.
If it’s not ready, replace the lid. Check to make sure your coals are still burning and replace the foil. Sometimes coals go out because of not enough air. Sometimes coals burn out because of too much air or long baking times. If your meal will take longer than 45 minutes to bake, you will probably need to add more coals part way through.
For hundreds of years, versatility and durability have made Dutch ovens a favorite cooking pot for explorers, cowboys and cooks of all types. The tradition continues with modern canoe trippers and campers who can carry the extra weight of Dutch ovens to their campsites and roast, bake and stew up their favorite meals.
The even heat of a cast-iron, Dutch oven makes sautéing, stewing, and all kinds of campfire cooking easier than on lightweight cookware. This alone makes it worth bringing along. But, enjoying fresh bread and warm baked desserts at the campsite brings wilderness cooking to a whole new level. You have to give it a try!
DeeDee’s Simple Lasagna Recipe
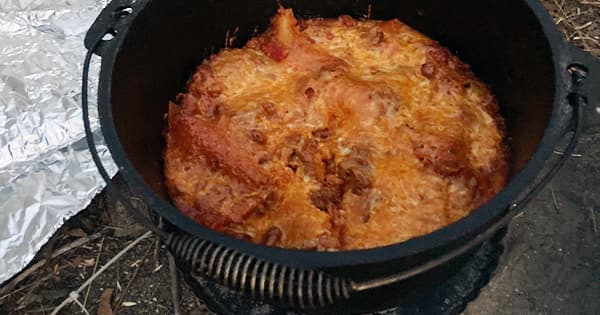
A great first campfire Dutch Oven meal
(Fits well in a 6qrt Dutch oven - feeds 4-6 hungry people
Ingredients:
1 package oven ready lasagna Noodles
1.5 - 2 quarts tomato sauce (seasoned how you like it)
1lb ground beef
1lb grated Mozzarella, cheddar or other Cheese
- Fry up the ground beef (and whatever veggies you like), add the tomato sauce - Set meat sauce aside.
- In the bottom of your Dutch oven put a small layer of the meat sauce (about ½ inch)
- - Place one layer of noodles on the sauce
- Put another ½ inch of sauce on the noodles
- Sprinkle on a layer of grated cheese
- Repeat these layers - noodles, sauce, cheese 3 more times. - Cover with the Dutch Oven Lid - Follow the How to instructions above to set up your oven and check your lasagna after about 35 minutes. When the cheese is melted and the noodles are soft, it's ready to eat.
Inspired by wanderlust and a passion for rivers, Adrian's paddling addiction has taken him across the globe. After pursuing his degree in Outdoor Recreation and Tourism Management, Adrian eventually settled in Palmer Rapids, Ontario. Here, he has worked for over a decade as the Director Of Operations at The Boundless School.
Related Articles
Before I was domesticated, I spent more than a decade working paddling gigs between paddling trips.…

So, you are finally out on the water and itching to spend more time outdoors – maybe go a bit further…

Every year we do a family and friends canoe trip. We usually tackle a river in Eastern Ontario or…
You may recall Abraham Maslow ‘s hierarchy of needs from ninth grade social studies. Maslow says, you…