Back-Up Recovery (Roll-Aid)
When you capsize what is your next action? If you don't know how to roll and you don't have a partner ready to give you their bow for an Eskimo recovery you will probably opt for the wet exit. However, a number of years ago Alistair Blachford invented the Back-Up inflation device. The Back-Up recovery device is a product from Roll-Aid Safety Inc.
I have spent my career working and teaching in the Adventure industry. Regardless of the sport (rock climbing, mountaineering, Scuba Diving, etc...) their is always redundancy built into our safety devices and systems. In common terms we always back things up. Here is such a product and it is appropriately named the "Back-Up".
The main purpose of the device is to give you another layer of possible action in the event of a capsize. If your roll doesn't work and you find yourself in a situation where you really don't want to get out of your kayak the Back-Up gives you a chance to right yourself while staying in your kayak. In the event you come out of your kayak after deploying the floatation bag it is also designed to be used as a paddle float so it is ready to use without having to take the time to inflate your other paddlefloat.
If your bracing skills are good you should never capsize, but in case you do it is nice to have options. The Back-Up provides you with a few more options.
The Back-Up is a cylindrical plastic container that houses a large floatation bag that automatically inflates via a 68g CO2 cartridge when the bag is pulled from the cylinder. The container is usually mounted to the bungee cords and deck lines (with the provided straps) on the front deck so you can easily reach it when capsized.

The handle is large and easy to grab. The bag deploys with one hand without much effort, but it must be a positive pull. It does not just fall out. The over 80 lbs. of positive buoyancy provided by the bright orange floatation bag makes rolling up easy or supplies great support if you need to use it for a paddle float.

Let's see how the Back-Up works.
You have capsized and your roll doesn't work or perhaps you do not have a reliable roll. You put your hands up for an Eskimo recovery, but your partner is not nearby and you feel yourself running out of air. You don't want to wet exit because of the location or your kayak, so the next option is using the Back-Up.
Before I continue I must add that you do have other stay in your kayak options, which is coming up and getting more air and/or swimming with your kayak to some object for support so you can right yourself. However, these options require a well composed paddler that has developed hang time (See USK article, "Escape From Kayak Attitude").
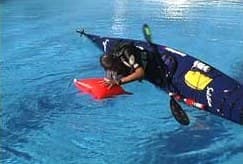
When you have decided to use your Back-Up device, grab the handle and pull. The orange float bag (which is folded in the canister) begins to slide out as you continue to pull (look closely at the underwater picture and you will see the uninflated orange bag as it is coming out of the canister).
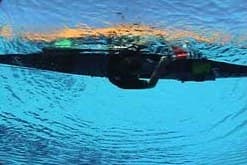
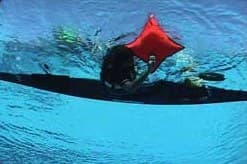
As the bag comes farther out of the cylinder the trigger mechanism, which is a nylon cord attached to the CO2 trigger, is activated. The CO2 cartridge gets punctured and the gas escapes and fills the bag.
Approximately 3 seconds later the bag is fully inflated. While keeping your original hand on the handle, which is underwater, you will reach up with your other hand to press down on the top of the bag.
When the bag is fully inflated there is tremendous floatation provided by the float. By pulling down with the hand that is underwater and pushing down on the top of the bag with your other hand you will have enough support to right your kayak.
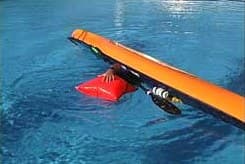
When you are underwater you will feel great support just with the one hand in the handle. However, as you beging to roll yourself up you will see that just using the hand in the handle will not give you enough leverage top right yourself. That is why that second hand is so important on top of the float bag.
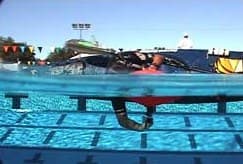
There is no reason to hurry or struggle to get yourself up. Use the float for support as you use your thighs to right your kayak and let your body follow. In fact, you can take a rest break to get a good breath just by resting your head on the top of the float bag. It is the same priciple when doing an Eskimo recovery (See USK article, "Eskimo Recovery"). Instead of rushing to get upright, when your head comes to the surface when performing an Eskimo recovery it is wise to stop and get a breath with your head resting on your hands that are holding your partner's bow. By taking that breath it keeps greater control of your body and kayak. I have seen students rush to get upright. In their excitement they snaped up to the surface and when they were upright they let go of their partner's bow. The momentum of getting upright quickly was still continuing and the student's kayak kept going and they capsized in the other direction. Bringing your head up and resting on the float and then using your thighs to do a hip snap will keep your kayak under greater control (See USK article, "Hip Snap").
As your find yourself getting near upright be sure to pull the float next to the kayak. If the float is too far away you will not get your body back over your cockpit.
Practicing this righting manuever is a critical component of this skill. When I first got the Back-Up device I orally inflated the bag and took it to the pool where I spent about two hours working with the floatation bag. I used the float bag as if I we resting on the edge of the pool to practicing my hip snaps.

Once you are fully up and feel stable find your paddle. Your paddle will be near your kayak. As a side note, I have a certain "Capsize Routine" that I have made a habit in the event of a capsize. Part of that routine is keeping my paddle parallel to my kayak after I capsize and have it floating next to my overturned kayak. One of my arms is making sure the paddle stays between my forearm and kayak. This way when I right my kayak my paddle will be very close by my cockpit.
Remember to keep hold of the float. There is a strap with a clip so you can attach the float onto your kayak in case you were to need it again or when you want to get your hands free.
With the bag attached behind the cockpit onto a rear bungee or deck line you are now free to paddle off. In addition, you are upright without having had to do that wet exit (the one you didn't want to do). If you were to capsize again you could look behind you and the already inflated float will be close by on the surface to be used again.

Practicing how to attach the float to your deck lines or bungees behind you and then using the float again is an important skill to develop. Your attachment point and the side in which you re-capsize will determine which way it will be best to retrieve your float bag and then roll back up. I suggest you get in a pool or clear water with a dive mask to orient yourself while you practice your technique.
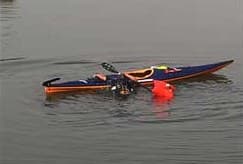
If you slipped out of your kayak while trying this maneuver or decided to wet exit after inflating the float, then use the float as a paddle float. There are straps attached to the Back-Up float bag that allows quick use as a paddle float.
I have personally used the Back-Up in a variety of conditions. I have found it to be reliable and function as it was designed. Here are some thoughts for your consideration.
Once you inflate the device you will not be able to repack it on the water. I am assuming you are in water conditions that are rough enough to have capsized you in the first place. The deflation time is slow and you have to replace the cartridge after it is deflated (only one inflation per cartridge). Trying to repack the cylinder when it is attached to the boat is very difficult. I found it best to repack while on shore.
If you need the Back-Up in the first place you are going to want to keep it inflated until you are in calm conditions or you are back on shore. If it is a very windy day make sure the float is securely attached to your kayak after you have inflated it.
I suggest you practice using the float before you need it in real conditions. I would not waste a CO2 cartridge for practice. Orally inflate the device and practice with it. Especially practice finding the float when it is inflated and attached behind you. Also practice using it as a paddle float.
Do you remember the wet re-entry and bow assist (Hadley Combo)? If you did wet exit you can try a wet re-entry and use the float to right yourself. Then pump out the water.
I am not suggesting the Back-Up is the perfect recovery device. It is just another layer in a multi-layer system of recovery options. If you are a paddler that likes to have back up systems then the Back-Up is a device you should consider. It is nice to have options. The Back-Up is available at the USK store.
Pictures seen above were taken from the USK video Capsize Recoveries & Rescue Procedures
Wayne Horodowich, founder of The University of Sea Kayaking (USK), writes monthly articles for the USK web site. In addition, Wayne has produced the popular "In Depth" Instructional Video Series for Sea Kayaking.
Related Articles
Even though they are flipping over, missing their gates and failing their maneuvers, they still look…
Last month we discussed how to detect and patch (not "repair") a leak on a typical roto-molded kayak…
This recovery is an excellent example of using components from two traditional recovery techniques and…
There are two ways of swimming through a rapid. You can swim defensively or offensively. Defensive…


