The Practical Paddler: Part 2
Rip! That's one sound no canoeist or kayaker wants to hear. But sooner or later, all of us will. Paddling and camping are hard on tents, packs, and clothing. At home, it's no big deal to mend a tear—if you have a sewing machine handy and know how to use it, that is, or if you know someone who does. But what happens when you're back of beyond? Most of us don't carry sewing machines in our boats. When a beaver-gnawed poplar pokes into a Duluth pack, or an edge of seam-tape that the builder forgot to sand slices through the sleeve of a paddling jacket, we're on our own. Ignoring the damage isn't an option. Small tears don't stay small for long.
Fortunately, stitching up a tear isn't difficult. But you need to know how, ###i
But what if you don't already have a ditty bag? Now's the time to make one up. Any small bag will do. And the contents don't have to come from a sailmaker's shop. You can probably find heavy-duty upholstery needles at your local HyperMart. Thread's no problem, either. Cotton or cotton-wrapped polyester's best. (The cotton swells when it gets wet. This helps to seal the holes.) If you add a hank of waxed cobbler's twine, you'll be ready for anything. Patching material? Mix and match. A scrap of sound canvas salvaged from an old tarp. A square of fabric torn from the tail of the poplin shirt you wore to paint the garage. A piece of denim cut from a discarded pair of jeans. Color doesn't matter. Once you leave the put-in, fashion takes second place to function.
Of course, you probably won't find a sailmaker's palm in the HyperMart. Don't worry. Sure, a palm can be useful, make no mistake. It'll save you a lot of grief if you have to sew multiple plies of heavy fabric. But unless you plan to ship aboard a square-rigger, it's almost never really necessary.
OK. You've got your tools. Now pick the ones you'll need for the job in hand. Match needle and thread to the fabric you're mending. The lighter the fabric, the thinner the needle and finer the thread. Canvas or heavy synthetic packcloth demands a sturdy needle and stout thread—maybe even waxed twine.
It's not enough to have all the right tools, though, is it? You need the right moves, too. And practice makes perfect. It's easier to learn the art of stitching while you're sitting at the kitchen table than when you're squatting on a riverbank in a drizzle, swatting mosquitoes. So grab a piece of denim, a good-sized needle, and some heavy thread. We're going to do a basic herringbone stitch. The herringbone's a classic, and there are many variations. This one's mine. Why? It's easy to remember once you've done it a few times, it's strong, and it's simple to sew. Who could ask for more?
Ready? Let's go! But first things first. How much thread should you cut off the spool? That depends on how big the tear is. This is no time to be stingy. It's better to cut too much than to be caught short. Since I'll be doubling the thread through the eye of the needle, I measure out a length that's at least four times the size of the tear—and I cross my fingers.

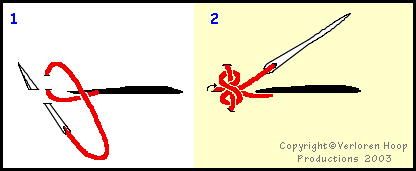
Start your stitch in sound fabric some distance away from the tear. Push the needle down through the cloth, then bring it up again. Line up the first entry hole with the long axis of the tear. Exit above. (Remember to leave a "tail" of thread. This tail will be oversewn to protect against unraveling.) Next, push the needle through the cloth below the first entry hole and bring it up to the left. Confused? Look at Step #1 in the sketch again. Now pull the thread tight. Don't pucker the cloth, though. The stitch should lie flat and smooth.
Warning! Here comes the tricky bit. Make a clove hitch like the one shown in Step #2. If it looks like a figure-eight when you've finished, congratulations! If not, try again. Begin by working the needle under the original loop stitch from right to left. Next, bring the thread down and across, moving diagonally over the top of the loop. Then push the needle under the loop from right to left again and reverse direction once more, sliding the needle under the diagonal stitch, but above the original loop. Pull tight—but not too tight. Got a figure-eight? Great!
Once you've anchored your stitch with a clove hitch, work your way toward the tear. Here's how:

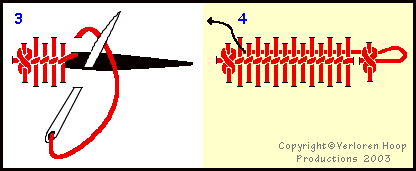
Push the needle down through the cloth in line with the axis of the tear, bringing it up to the right of the first stitch. Then carry the loop of the new stitch below the axis, push the needle in, and bring it back through on the axis, just to the left of the new loop. Now cross over the loop and begin again. Stagger the loops: short-long-short-long…. Once you reach the tear, pass the needle through the rent. (See Step #3, above.) And as you sew, draw each loop snug. Not too snug, though! You want to bring the edges of the tear together smoothly, without wrinkles or puckers. When you've completely closed the tear, continue the line of stitches in sound fabric. Finish up with a final stitch and a second clove hitch (Give yourself a little room to make the hitch. See Step #4). Lastly, work the thread under the upper limbs of the long stitches, returning the way you came. Snip off any excess thread. You're done!
Does your first effort looks more like a mare's nest than a herringbone? Don't be discouraged. Be glad you're not squatting by a river, swatting mosquitoes. It's a lot easier to learn seated at the kitchen table. Just try again. Practice makes perfect. And remember: a stitch in time saves nine!
Copyright © 2002 by Verloren Hoop Productions. All rights reserved.
Related Articles
In this video, the team at Austin Kayak show you how to rebuild your keel if you have created a hole…
I remember the anticipation of the spring thaw when I could finally get out on the water again after a…
"The major difference between a thing that might go wrong and a thing that cannot possibly go wrong is…
Rail Tape is a good investment for your plastic or fiberglass board - it keeps it from getting chipped…


